Tag Archives: baking

Baking Food

Artisan Bread in a Bread Machine

Hey friends! It seems I’ve gotten around to posting around once or twice a month lately, but if you want more frequent updates, hacks and all the latest on all things food, join me here on my Facebook page where friends and foodies will regale you with their witty and insightful banter.

I once sat with a tarot card reader at a party who told me that I needed to do something creative and with my hands. (She also implied that I was going to come into some type of large fortune, but, unless she meant a pretty decent loquat harvest, so far, no dice.)

She was right though – I do get great satisfaction from working with my hands and am probably happiest when I’m working in the garden. There was an article recently about how microbes in the soil combat depression. I don’t know if it’s the microbes in the soil or the fantastic conversations I have with the fruit trees, but being barefoot and feeling connected to the Earth definitely does something for me.

Also not long ago, I read a piece in the New York Times about gluten sensitivities. While there are certainly people with bona-fide celiac disease who can’t tolerate any amount of gluten, there are also countless people who believe they have gluten sensitivities that can ultimately be attributed to other things, like commercial leavening ingredients and preservatives.

I’m certainly no expert on the subject, but I am a fan of simple ingredients, so I started making my own bread this past year. It’s been a long road but I’ve finally gotten to a point where I think my bread qualifies as delicious: fragrant, crunchy crust and a moist, stretchy interior with lots of big nooks and crannies to show off the glutinous fibers.

I am not a big fan of cleanup, so I use a bread machine to handle the autolyse (rest), kneading and rising.

I also start with a sourdough starter, which is a living thing and which I consider a pet (Pete!). The older your starter, the more developed and complex the flavors; we’ve had Pete for about 10 years now. Check out Pete’s awesome glutinousness!

But if you don’t have a starter, you can start with the poolish in the recipe below; if you want to make a starter, click here for a recipe and instructions.

I modified a recipe I found online, over time, as I like more moisture in my bread and a little more salt. 

ARTISAN BREAD WITH A BREAD MACHINE from Bread Experience with my modifications:

Poolish
1/3 cup (2 5/8 ounces) cool water (about 65°F)
1/2 cup (2 1/8 ounces) European-Style Artisan Bread Flour
1/16 teaspoon (a pinch) instant yeast

Dough
All of the poolish (above)
3/4 cup (6 ounces) cool water, about 65°F
2 1/2 cups (10 3/4 ounces) European-Style Artisan Bread Flour
1 teaspoon instant yeast
1 1/2 teaspoons salt

The poolish:

In a medium-sized bowl, combine all of the poolish ingredients, mixing just till a cohesive dough forms. Allow the poolish to rest, covered, for 12 to 16 hours at room temperature. When the poolish is ready to use, it will be filled with large holes and bubbles.

The dough:

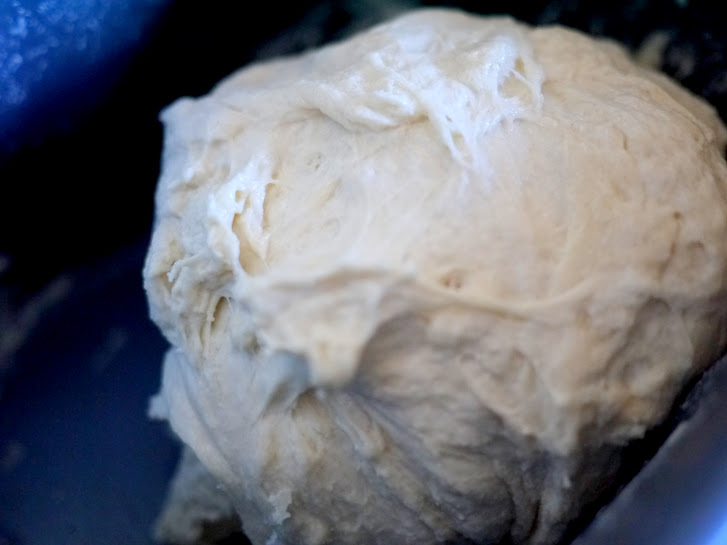
Add the water to the poolish or sourdough starter, and mix till smooth. Add the flour, and the yeast (I add yeast here so that it gets mixed in and protected from the salt, which will come in later), mix till just combined, cover the bowl, and allow the mixture to rest for 20 minutes. This rest period (autolyse, in French) allows the flour to absorb the liquid and the gluten to start its development, making kneading easier and more effective. Add the salt, and knead the dough till it’s fairly smooth but not necessarily elastic, 5 to 7 minutes in a bread machine. (The gluten will continue to develop as the dough rises, so you don’t want to develop it fully during the kneading process.)

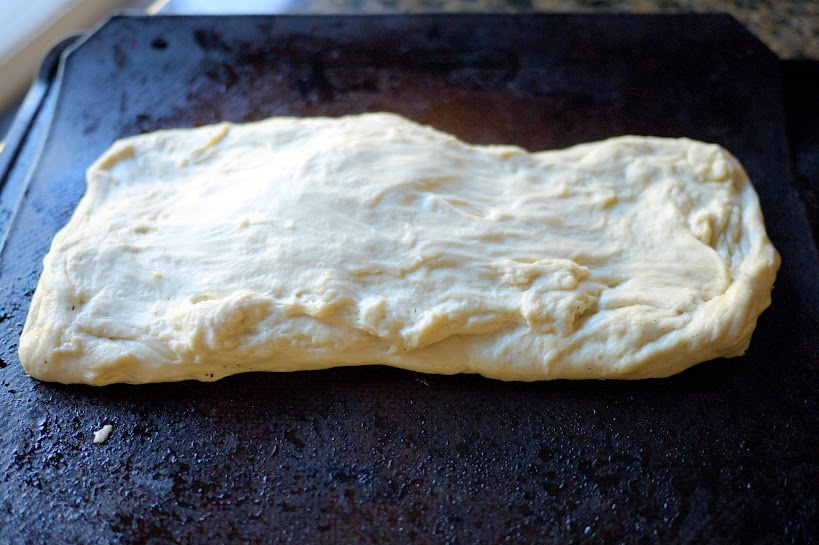
This is what the dough looks like when I get to this point. If it’s looking dry, add water just a couple of drops at a time so that it’s moist but not super wet. Sometimes depending on how the dough looks, I might end up adding up to another 1/4 cup of water.

Close the lid on the bread machine and let the dough rise for 1 1/2 hours. To help develop the gluten, distribute the yeast’s food, and expel any excess carbon dioxide, turn the dough every 30 minutes during the rising time: gently fold all four sides into the middle, and turn the dough over.

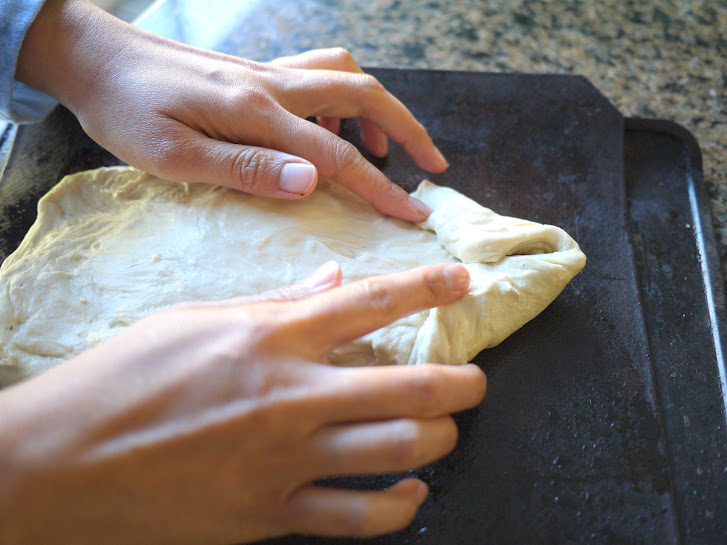
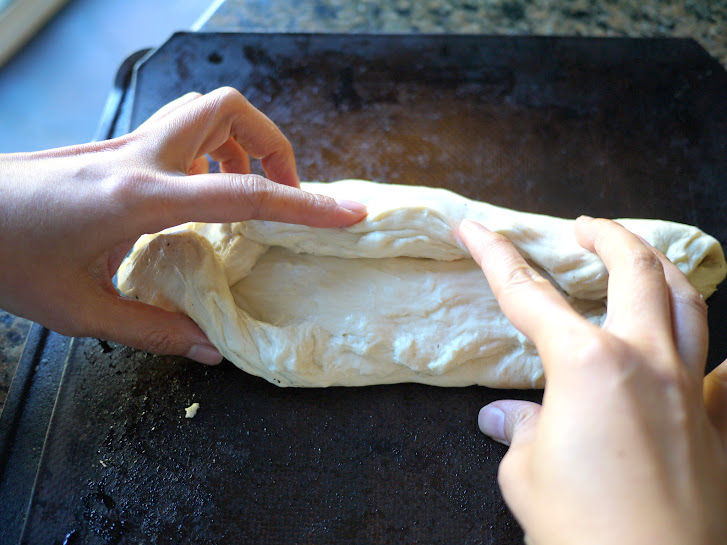
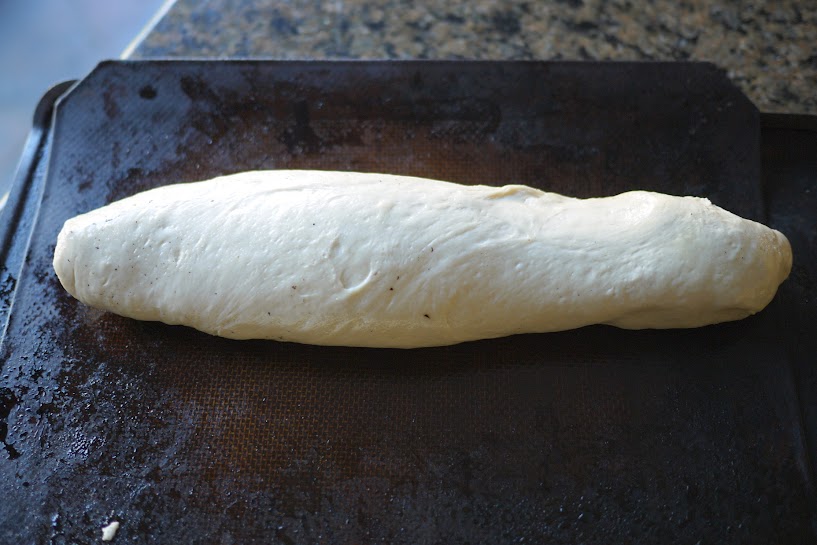
Transfer the dough to a lightly greased work surface, divide it in half, shape each half into a rough log, cover them, and let them rest for 15 to 20 minutes. Again, this gives the gluten a chance to relax.

Shape the logs into batards (shorter and fatter than traditional French baguettes) or Italian-style loaves—tapered ovals about 12″ long. Place them on a lightly greased or parchment-covered baking sheet, cover them with an acrylic dough cover, stick them in an oven that’s off (that’s what I do, but I have two ovens), or gently with lightly greased plastic wrap, and allow them to rise, at room temperature, for about 2 hours; they should rise about three-quarters of the way to doubled. If they rise too much they’ll lose their shape in the oven, so be sure they don’t over-rise.

This is how I shape the dough:

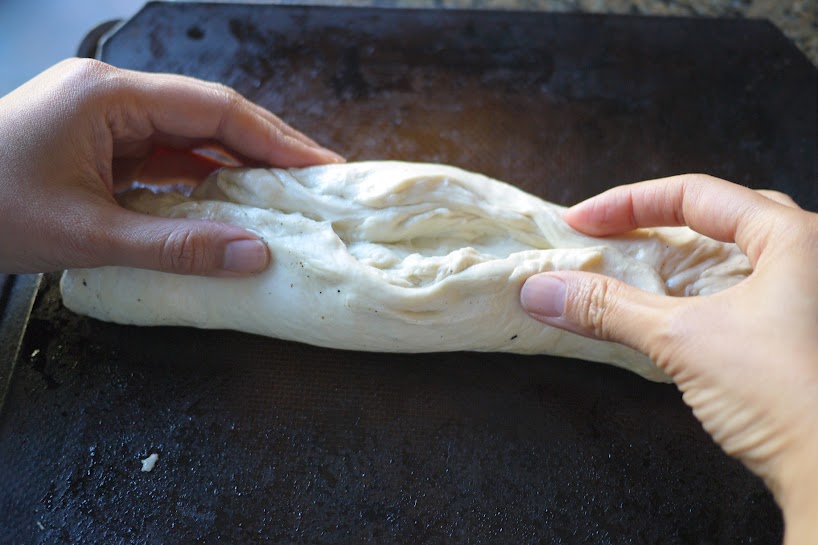
At this point I flip the log over so that the seem is on the bottom.

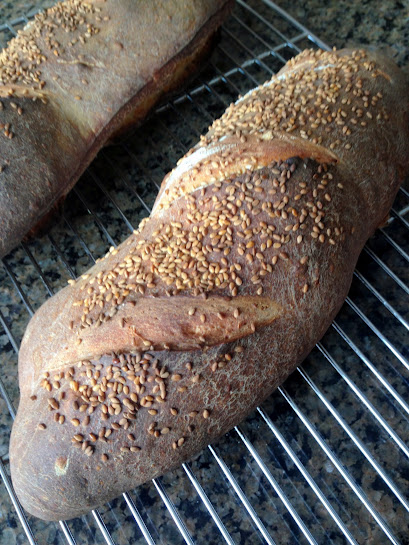
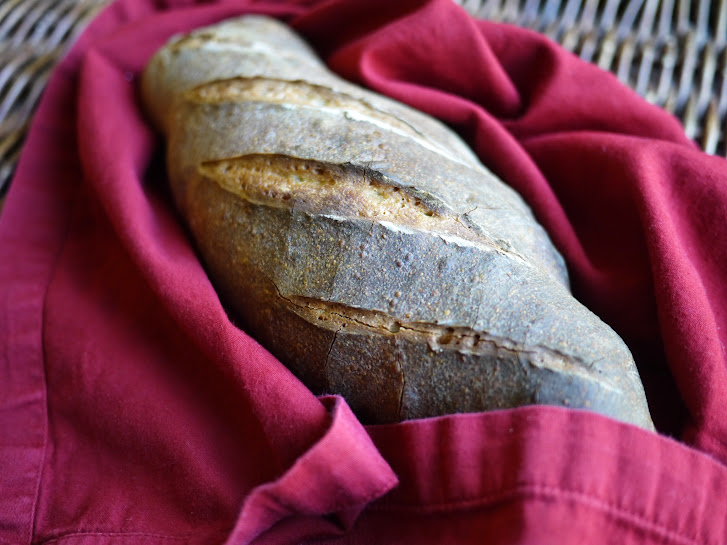
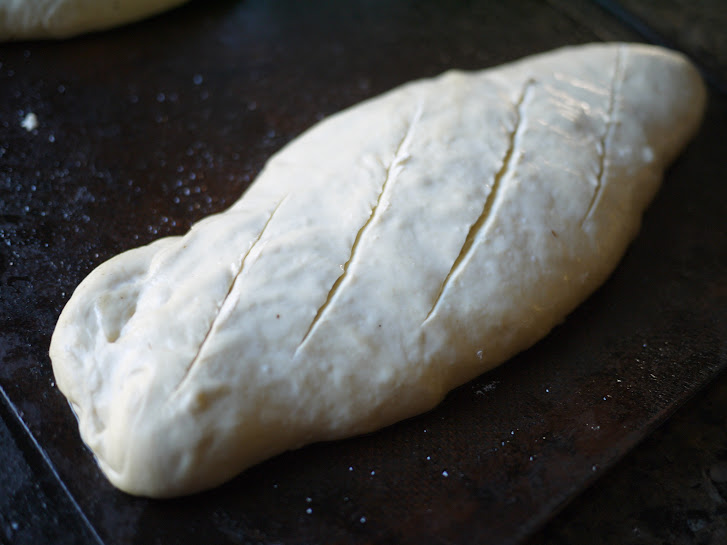
Using a sharp knife or razor, and holding it parallel to the dough*, make four slashes in each loaf. These should be more nearly vertical (running down the loaf) than horizontal (running crosswise), each stretching about one-third the length of the loaf. I find it easiest to do this with a serrated knife whose blade has been dipped in flour. Cut swiftly! Spray the loaves with warm water.

Preheat your oven to 425°F, making sure you give it plenty of time to heat; this bread needs to go into a HOT oven. Bake the bread for 30 to 35 minutes, or until it’s a deep, golden brown.

Note: European bread is generally baked longer than American loaves; if you’re uncomfortable with a very dark crust, reduce the baking time a bit. Turn off the oven, crack the door open about 4 to 6 inches, and allow the bread to cool in the oven; this will help it retain its crunchy crust.

Yield: 2 loaves.

*The blade shouldn’t descend into the dough at a 90° angle; rather it should slice under the surface at about 10° to 20°. This will allow the loaf to rise in a more attractive fashion as it’s baking.

I’ve also broken the dough into 4 mini-loaves, and baked them for lunch-sized portions. Recently, I’ve been adding on sesame and chia seeds — just sprinkle them on right after you’ve sprayed the dough with water, and bake as outlined above.

Baking Food

The Daddy of All Cake / Cookie / Cake Pop Decorating Tips

The Decorated Cookie Logo
The Decorated Cookie has posted some life-changing decorating techniques on her site today.

When I saw this this morning, I nearly passed out. It was as if I lived in 200 BC and spent my whole life trying to figure out what the circumference of the earth was (just forget for now that they thought the earth was a giant terrarium), tried a bunch of measuring techniques, got all prune-y and sunburned doing it, and then someone just came up to me and said: 24,901.55 miles.

I wish I were one of those bloggers who could refer you to “my pal Meaghen Mountford“, but the truth is she has no idea that I exist and fortunately for her, has never seen me bake. But Meaghen has a book and a website about all things baked, cute and decorated.

And today, Meaghen posted a startling compilation of tips from her readers — you can find it here.  Some highlights include mess-free ways to handle the frosting mixing and piping (from Karen’s Cookies), tips on keeping cupcakes moist by freezing them, and — I’ve heard this one before from Melissa V who made the initial cake pops that got me into all of this — adding shortening to the candy coating for cake pops.

And have you heard of this? A KopyKake Projector? I could go crazy with something like this. Nevermind that it will take up half my house — look at all the cute things you can make with it! And you could probably even make up the cost of it by providing tattooing services with it in the comfort of your own home, right? I’m sure tattooing is easy. I have food coloring.

Now, back to sitting around in yoga pants. Happy President’s Day!

Baking Cooking Food

Homemade Granola

Happy Valentine’s Day!  To celebrate, I’ll share a picture of the one decent Valentine’s Day cookie that I did with royal icing. Will post about that another time, after I’ve recovered from the royal icing initiation.  I’ll just have to eat the rest of the evidence.

Valentine's Day cookie
The only cookie I'm willing to share publicly. Stamped the paper plate with non-toxic metallic ink.

Today one of my girls was home sick, so we spent a lazy day completely indoors and mostly in the kitchen. Which means we had plenty of time to make stuff. So I decided to try out Ina Garten’s Homemade Granola recipe that my friend Heidi shared with me. She said that it was delicious, and I proved it by having three bowls of it after I made it.   Here’s a closeup so you can get a sense of its sweet and nutty delectableness (look it up! It’s actually a word):

Homemade granola closeup

And it’s so easy to make that even I, who did this last time I tried to make something with rolled oats, was able to make it:

Burnt oats
This happened the last time I roasted oats. I followed the instructions and put them into the oven, took a shower, and came out with the whole house smelling burnt. Please do not shower when you are roasting oats.

Basically, all you do is coat oats, coconut and almonds in an oil-and-honey mixture, roast (you’ll want to turn them every 8-10 minutes to ensure even browning and to prevent the above from happening), and take them out when they’re a nice caramel brown all over.  Let it cool, and add in the dried fruit and cashews.  I bought some particularly plump dried cranberries and they made the cran-bites especially tasty.

Cooled granola with dried fruit and nuts
I used a rimmed baking tray for this and mixed the dried fruit in while the granola was on the tray for even distribution.

This was the first time I’ve made granola so I didn’t really mess with the recipe, but I’m seeing a lot of room for experimentation here (Raisins? Sunflower seeds? Tiny doll accessories embedded in my carpet?). After it all cooled (ok, and after I ate about a quarter of it) I put it into an airtight container, and am storing it next to my other cereals.  It’s the prettiest of the bunch!

Finished granola
Portrait of granola.

Here’s the recipe, courtesy of Ina Garten via my friend Heidi:

HOMEMADE GRANOLA

Ingredients

  • 4 cups old-fashioned rolled oats
  • 2 cups sweetened shredded coconut
  • 2 cups sliced almonds
  • 3/4 cup vegetable oil
  • 1/2 cup good honey
  • 1 1/2 cups small diced dried apricots
  • 1 cup small diced dried figs
  • 1 cup dried cherries
  • 1 cup dried cranberries
  • 1 cup roasted, unsalted cashews

Directions
Preheat the oven to 350 degrees F.

Toss the oats, coconut, and almonds together in a large bowl. Whisk together the oil and honey in a small bowl. Pour the liquids over the oat mixture and stir with a wooden spoon until all the oats and nuts are coated. Pour onto a 13 by 18 by 1-inch sheet pan. Bake, stirring occasionally with a spatula, until the mixture turns a nice, even, golden brown, about 45 minutes.

Remove the granola from the oven and allow to cool, stirring occasionally. Add the apricots, figs, cherries, cranberries, and cashews. Store the cooled granola in an airtight container.


Baking Food

Fondant Decorated Cookies

Nowadays, everything baked as cute-potential to me. Years of obligatory Christmas cookie baking have pushed me into mastering the shortbread cookie, but I was always a little sad that mine didn’t look cute. Certainly not Amy Atlas-cute. On the plus side, people who got my cookies knew they were definitely homemade.

One thing that has always fascinated/terrified me is fondant. On the one hand, it tastes gross. On the other hand, it looks amazing. Since it looks amazing, I always assumed that I, She Who Was Cursed With Inability to Make Frosting, would never be able to do it. Well, turning 40 has emboldened me and now that I have also successfully made frosting, I decided to give it a whirl. Note: if you do not want to spend a couple of hours scrubbing fondant scraps off the floor after you make it, I recommend that you don’t do this with your kids the first time. Nobody told me that. If I wrote a cookbook I would tell you these things.

First, the fondant-decorated cookies!

Fondant Decorated Cookies

I started by baking up a batch of shortbread cookies. I felt a little guilty about all the butter that goes into shortbread, so I modified the recipe a tiny bit by subbing the last tablespoon of butter with a tablespoon of NUTIVA Organic Extra Virgin Coconut Oil, which is the coconut oil that I think tastes the best.  I’ll paste in the cookie recipe below too. So you end up with a cookie that looks like this:

Shortbread Cookie

Now, the fondant prep was so messy and I did it with my kids that I would have required 8 more hands in order to have photographed it. But I will refer you to a great video tutorial (made by someone who apparently does have 8 more hands) on how to make marshmallow fondant. In my research the marshmallow fondant was easier and tastier than traditional fondant. And I have to say, it was pretty tasty for fondant.

Once the fondant is ready, you just roll it out — I used parchment paper sprinkled with cornstarch, both under and over the fondant (so I used my rolling pin over the top piece of parchment) and rolled out til it was about 1/8 inch. After this it’s pretty much like working with Play-Doh. You can color the fondant with a gel paste food coloring — you’ll need to knead it for a while to distribute the color (I recommend wearing plastic gloves for this if you’re not dressing up as Lady Macbeth in the near future). You can cut out shapes with cookie cutters or a knife and then make it stick to the cookie by wetting the back of the fondant like we used to do with postage stamps before sticking it onto the cookie.

Cutting out fondant
Excuse her dirty fingernails.


Fondant Cookies
Fondant cookies my kids made

I also did a few with royal icing that looked so bad that I’m telling people that my kids made them.

And just when you thought you’d be safe from sports on this decidedly unathletic blog, I just have share my favorite internet activity around Jeremy Lin and the ensuing Linsanity. I love Cinderella and underdog stories about Chinese /Taiwanese-American third-string NBA players from Harvard (so apparently do Rainn Wilson and Spike Lee), and this is one of the best. His quiet demeanor and humility just add to the charm:

Ok, back to the baking. I don’t recall the source of this recipe, which I’ve modified, except that it came from a Christmas cookie exchange years ago and I’ve used it ever since.

SHORTBREAD COOKIES

Ingredients

  • 1 1/3 cups (2 sticks + 5 tbsp) unsalted butter, at room temperature
  • 1 tbsp coconut oil (Nutiva preferred)
  • 2/3 cup sugar
  • 3/4 tsp salt
  • 3/4 tsp vanilla extract
  • 3 cups all-purpose flour

Preparation

Preheat oven to 275 degrees.

Use an electric mixer with paddle attachment, and cream butter and sugar on medium speed til light and fluffy, about 2 minutes.  Add salt and vanilla and beat to combine. Add flour one cup at a time, beating on low speed until just combined.

Roll out dough between two sheets of floured wax or parchment paper using a rolling pin. Bake until pale golden, but not browned, about 13-15 minutes. Cool on a wire rack. Cool completely before decorating.


MARSHMALLOW FONDANT

I got this recipe off of About.com and it’s pretty much perfect.

Ingredients

  • 8 ounces miniature marshmallows (4 cups not packed, or half of a 16-ounce bag)
  • 1 pound powdered sugar (4 cups), plus extra for dusting
  • 2 tbsp water
  • Food coloring or flavored extracts, optional

Preparation

Dust your counter or a large cutting board with powdered sugar. Place the marshmallows and the water in a large microwave-safe bowl. Microwave on high for 1 minute, until the marshmallows are puffy and expanded.

Stir the marshmallows with a rubber spatula until they are melted and smooth. If some unmelted marshmallow pieces remain, return to the microwave for 30-45 seconds, until the marshmallow mixture is entirely smooth and free of lumps. If you want colored or flavored fondant, you can add several drops of food coloring or extracts at this point and stir until incorporated. If you want to create multiple colors or flavors from one batch of fondant, do not add the colors or flavors now. Instead, refer to step 6 below for instructions.

Add the powdered sugar and begin to stir with the spatula. Stir until the sugar begins to incorporate and it becomes impossible to stir anymore.

Scrape the marshmallow-sugar mixture out onto the prepared work surface. It will be sticky and lumpy, with lots of sugar that has not been incorporated yet–this is normal. Dust your hands with powdered sugar, and begin to knead the fondant mixture like bread dough, working the sugar into the marshmallow with your hands.

Continue to knead the fondant until it smoothes out and loses its stickiness. Add more sugar if necessary, but stop adding sugar once it is smooth–too much sugar will make it stiff and difficult to work with. Once the fondant is a smooth ball, it is ready to be used. You can now roll it out, shape it, or wrap it in cling wrap to use later. Well-wrapped fondant can be stored in a cool room or in the refrigerator, and needs to be kneaded until supple before later use.

If you want to add coloring or flavoring to your fondant, flatten it into a round disc. You might want to wear gloves to avoid getting food coloring on your hands during this step. Add your desired amount of coloring or flavoring to the center of the disc, and fold the disc over on itself so that the color or flavor is enclosed in the center of the fondant ball.

Begin to knead the ball of fondant just like you did before. As you work it, you will begin to see streaks of color coming through from the center. Continue to knead until the streaks are gone and the fondant is a uniform color. Your fondant is now ready to be used or stored as outlined above.