Category Archives: Baking

Baking Food

Angry Birds Cookies

I’ve been making lots of wintery stews lately, and have even taken pictures, but I’ve been engulfed by Downton Abbey and have only just finished Season 1, so I have to keep my priorities straight, but look for those recipes in the near future. I’m thinking about having a Downton Abbey party. This idea hasn’t really materialized fully in my head yet, except that it would be really nice to have a staff of servants (which my children are proving out not to be), even if some of them can be quite damaging (though from what I’ve seen so far, mostly toward each other). I’m sure the party will need to involved these paper dolls, Edwardian desserts, and a whole new wardrobe for me. My husband’s English, and so are my neighbors, so maybe I can just have them milling around Englishing everything for effect.

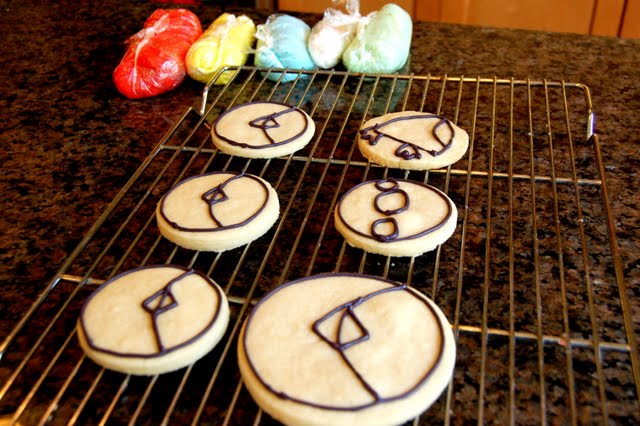
Between Downton Abbey episodes, the kids and I did some cookie decorating. Our friends have a son who is really into Angry Birds. I mean, really into Angry Birds — not only does he play the game, he has the board game, pillow cushions, plush toys — you get the picture. I took a Downton Abbey quiz and discovered that my Downton Abbey character is the Earl of Grantham, so you will not be surprised to know that I’ve actually never played. We wanted to thank this family for something, so we made these cookies. I used the shortbread recipe I usually use, this time without subbing the coconut oil for butter (in truth, I haven’t found anything that tastes quite as much like butter as butter).  The kids started out by doing some sketches:

The daughter in this family isn't as into Angry Birds so we did a penguin and a bunny too.

I prepared the frosting, using for the first time the plastic wrap method from Karen’s Cookies, which worked GREAT and made for very little mess.  Then I outlined the cookies in black.

Cookies outlined
See the little frosting packets in the back? What a great idea (not mine)!

Next, flooded them:

Flooded cookies

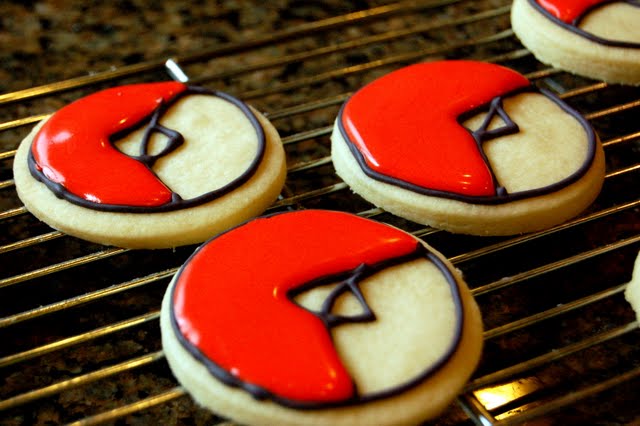
(If you’re looking for a great tutorial on working with royal icing, visit Sweetopia, but on the condition that you do not compare her cookies to mine.)

We had to allow for drying time between layers, but it was easy enough to add eyes and fill in the beaks.

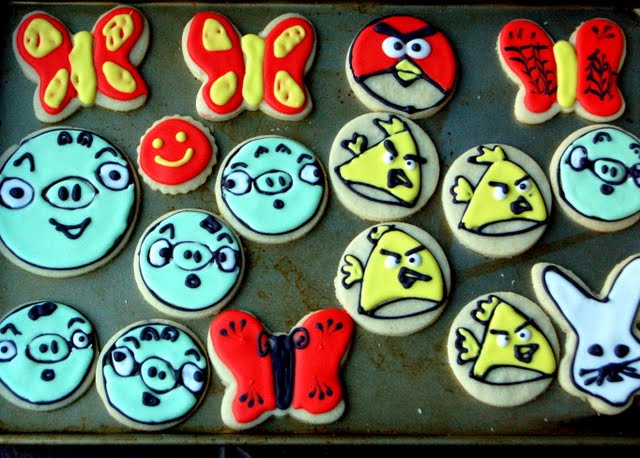
This was a first run, so I’d do some things differently. For one, you’ve probably noticed I didn’t follow the sketches. But I laid out this page to make it seem like I did. Next time, I’ll follow the sketches. I also started out outlining the eyeballs in black, but it made the birds look myopic and possibly Silicon Valley hipster geek-ish, and not quite as angry as I hoped. You’ll notice the bird just underneath the penguin in the photo above looks more like Concerned Bird than Angry Bird…and the beaks on the yellow birds makes them look like Twilight fans with goth lipstick. Should not have done them in black.  For the pigs, I should have flooded the whole circle first and then drawn in the detail, instead of having done the eyes and nose as part of the initial outline. And those things that were supposed to be ears? I should have skipped them.

Here are our other cookies. Here you’ll see Deranged Pig, Deeply Disturbed Pig, butterflies, a happy face and a bunny that must be related somehow to Charlie Chaplin.

It was a good way to spend a Saturday. Actually, I had totally forgotten that my husband had invited a friend over at 1, so at 12:50 I was still in pajamas, a hideous hair clip and had gel paste food coloring all over my hands. I ran upstairs to get dressed and the gel paste coloring was getting everywhere — like when I put moisturizer on my face, it was green. See, I do need servants.

Have any ideas for a Downton Abbey party? Please share!

Baking Food

The Daddy of All Cake / Cookie / Cake Pop Decorating Tips

The Decorated Cookie Logo
The Decorated Cookie has posted some life-changing decorating techniques on her site today.

When I saw this this morning, I nearly passed out. It was as if I lived in 200 BC and spent my whole life trying to figure out what the circumference of the earth was (just forget for now that they thought the earth was a giant terrarium), tried a bunch of measuring techniques, got all prune-y and sunburned doing it, and then someone just came up to me and said: 24,901.55 miles.

I wish I were one of those bloggers who could refer you to “my pal Meaghen Mountford“, but the truth is she has no idea that I exist and fortunately for her, has never seen me bake. But Meaghen has a book and a website about all things baked, cute and decorated.

And today, Meaghen posted a startling compilation of tips from her readers — you can find it here.  Some highlights include mess-free ways to handle the frosting mixing and piping (from Karen’s Cookies), tips on keeping cupcakes moist by freezing them, and — I’ve heard this one before from Melissa V who made the initial cake pops that got me into all of this — adding shortening to the candy coating for cake pops.

And have you heard of this? A KopyKake Projector? I could go crazy with something like this. Nevermind that it will take up half my house — look at all the cute things you can make with it! And you could probably even make up the cost of it by providing tattooing services with it in the comfort of your own home, right? I’m sure tattooing is easy. I have food coloring.

Now, back to sitting around in yoga pants. Happy President’s Day!

Baking Cooking Food

Homemade Granola

Happy Valentine’s Day!  To celebrate, I’ll share a picture of the one decent Valentine’s Day cookie that I did with royal icing. Will post about that another time, after I’ve recovered from the royal icing initiation.  I’ll just have to eat the rest of the evidence.

Valentine's Day cookie
The only cookie I'm willing to share publicly. Stamped the paper plate with non-toxic metallic ink.

Today one of my girls was home sick, so we spent a lazy day completely indoors and mostly in the kitchen. Which means we had plenty of time to make stuff. So I decided to try out Ina Garten’s Homemade Granola recipe that my friend Heidi shared with me. She said that it was delicious, and I proved it by having three bowls of it after I made it.   Here’s a closeup so you can get a sense of its sweet and nutty delectableness (look it up! It’s actually a word):

Homemade granola closeup

And it’s so easy to make that even I, who did this last time I tried to make something with rolled oats, was able to make it:

Burnt oats
This happened the last time I roasted oats. I followed the instructions and put them into the oven, took a shower, and came out with the whole house smelling burnt. Please do not shower when you are roasting oats.

Basically, all you do is coat oats, coconut and almonds in an oil-and-honey mixture, roast (you’ll want to turn them every 8-10 minutes to ensure even browning and to prevent the above from happening), and take them out when they’re a nice caramel brown all over.  Let it cool, and add in the dried fruit and cashews.  I bought some particularly plump dried cranberries and they made the cran-bites especially tasty.

Cooled granola with dried fruit and nuts
I used a rimmed baking tray for this and mixed the dried fruit in while the granola was on the tray for even distribution.

This was the first time I’ve made granola so I didn’t really mess with the recipe, but I’m seeing a lot of room for experimentation here (Raisins? Sunflower seeds? Tiny doll accessories embedded in my carpet?). After it all cooled (ok, and after I ate about a quarter of it) I put it into an airtight container, and am storing it next to my other cereals.  It’s the prettiest of the bunch!

Finished granola
Portrait of granola.

Here’s the recipe, courtesy of Ina Garten via my friend Heidi:

HOMEMADE GRANOLA

Ingredients

  • 4 cups old-fashioned rolled oats
  • 2 cups sweetened shredded coconut
  • 2 cups sliced almonds
  • 3/4 cup vegetable oil
  • 1/2 cup good honey
  • 1 1/2 cups small diced dried apricots
  • 1 cup small diced dried figs
  • 1 cup dried cherries
  • 1 cup dried cranberries
  • 1 cup roasted, unsalted cashews

Directions
Preheat the oven to 350 degrees F.

Toss the oats, coconut, and almonds together in a large bowl. Whisk together the oil and honey in a small bowl. Pour the liquids over the oat mixture and stir with a wooden spoon until all the oats and nuts are coated. Pour onto a 13 by 18 by 1-inch sheet pan. Bake, stirring occasionally with a spatula, until the mixture turns a nice, even, golden brown, about 45 minutes.

Remove the granola from the oven and allow to cool, stirring occasionally. Add the apricots, figs, cherries, cranberries, and cashews. Store the cooled granola in an airtight container.


Baking Food

Fondant Decorated Cookies

Nowadays, everything baked as cute-potential to me. Years of obligatory Christmas cookie baking have pushed me into mastering the shortbread cookie, but I was always a little sad that mine didn’t look cute. Certainly not Amy Atlas-cute. On the plus side, people who got my cookies knew they were definitely homemade.

One thing that has always fascinated/terrified me is fondant. On the one hand, it tastes gross. On the other hand, it looks amazing. Since it looks amazing, I always assumed that I, She Who Was Cursed With Inability to Make Frosting, would never be able to do it. Well, turning 40 has emboldened me and now that I have also successfully made frosting, I decided to give it a whirl. Note: if you do not want to spend a couple of hours scrubbing fondant scraps off the floor after you make it, I recommend that you don’t do this with your kids the first time. Nobody told me that. If I wrote a cookbook I would tell you these things.

First, the fondant-decorated cookies!

Fondant Decorated Cookies

I started by baking up a batch of shortbread cookies. I felt a little guilty about all the butter that goes into shortbread, so I modified the recipe a tiny bit by subbing the last tablespoon of butter with a tablespoon of NUTIVA Organic Extra Virgin Coconut Oil, which is the coconut oil that I think tastes the best.  I’ll paste in the cookie recipe below too. So you end up with a cookie that looks like this:

Shortbread Cookie

Now, the fondant prep was so messy and I did it with my kids that I would have required 8 more hands in order to have photographed it. But I will refer you to a great video tutorial (made by someone who apparently does have 8 more hands) on how to make marshmallow fondant. In my research the marshmallow fondant was easier and tastier than traditional fondant. And I have to say, it was pretty tasty for fondant.

Once the fondant is ready, you just roll it out — I used parchment paper sprinkled with cornstarch, both under and over the fondant (so I used my rolling pin over the top piece of parchment) and rolled out til it was about 1/8 inch. After this it’s pretty much like working with Play-Doh. You can color the fondant with a gel paste food coloring — you’ll need to knead it for a while to distribute the color (I recommend wearing plastic gloves for this if you’re not dressing up as Lady Macbeth in the near future). You can cut out shapes with cookie cutters or a knife and then make it stick to the cookie by wetting the back of the fondant like we used to do with postage stamps before sticking it onto the cookie.

Cutting out fondant
Excuse her dirty fingernails.


Fondant Cookies
Fondant cookies my kids made

I also did a few with royal icing that looked so bad that I’m telling people that my kids made them.

And just when you thought you’d be safe from sports on this decidedly unathletic blog, I just have share my favorite internet activity around Jeremy Lin and the ensuing Linsanity. I love Cinderella and underdog stories about Chinese /Taiwanese-American third-string NBA players from Harvard (so apparently do Rainn Wilson and Spike Lee), and this is one of the best. His quiet demeanor and humility just add to the charm:

Ok, back to the baking. I don’t recall the source of this recipe, which I’ve modified, except that it came from a Christmas cookie exchange years ago and I’ve used it ever since.

SHORTBREAD COOKIES

Ingredients

  • 1 1/3 cups (2 sticks + 5 tbsp) unsalted butter, at room temperature
  • 1 tbsp coconut oil (Nutiva preferred)
  • 2/3 cup sugar
  • 3/4 tsp salt
  • 3/4 tsp vanilla extract
  • 3 cups all-purpose flour

Preparation

Preheat oven to 275 degrees.

Use an electric mixer with paddle attachment, and cream butter and sugar on medium speed til light and fluffy, about 2 minutes.  Add salt and vanilla and beat to combine. Add flour one cup at a time, beating on low speed until just combined.

Roll out dough between two sheets of floured wax or parchment paper using a rolling pin. Bake until pale golden, but not browned, about 13-15 minutes. Cool on a wire rack. Cool completely before decorating.


MARSHMALLOW FONDANT

I got this recipe off of About.com and it’s pretty much perfect.

Ingredients

  • 8 ounces miniature marshmallows (4 cups not packed, or half of a 16-ounce bag)
  • 1 pound powdered sugar (4 cups), plus extra for dusting
  • 2 tbsp water
  • Food coloring or flavored extracts, optional

Preparation

Dust your counter or a large cutting board with powdered sugar. Place the marshmallows and the water in a large microwave-safe bowl. Microwave on high for 1 minute, until the marshmallows are puffy and expanded.

Stir the marshmallows with a rubber spatula until they are melted and smooth. If some unmelted marshmallow pieces remain, return to the microwave for 30-45 seconds, until the marshmallow mixture is entirely smooth and free of lumps. If you want colored or flavored fondant, you can add several drops of food coloring or extracts at this point and stir until incorporated. If you want to create multiple colors or flavors from one batch of fondant, do not add the colors or flavors now. Instead, refer to step 6 below for instructions.

Add the powdered sugar and begin to stir with the spatula. Stir until the sugar begins to incorporate and it becomes impossible to stir anymore.

Scrape the marshmallow-sugar mixture out onto the prepared work surface. It will be sticky and lumpy, with lots of sugar that has not been incorporated yet–this is normal. Dust your hands with powdered sugar, and begin to knead the fondant mixture like bread dough, working the sugar into the marshmallow with your hands.

Continue to knead the fondant until it smoothes out and loses its stickiness. Add more sugar if necessary, but stop adding sugar once it is smooth–too much sugar will make it stiff and difficult to work with. Once the fondant is a smooth ball, it is ready to be used. You can now roll it out, shape it, or wrap it in cling wrap to use later. Well-wrapped fondant can be stored in a cool room or in the refrigerator, and needs to be kneaded until supple before later use.

If you want to add coloring or flavoring to your fondant, flatten it into a round disc. You might want to wear gloves to avoid getting food coloring on your hands during this step. Add your desired amount of coloring or flavoring to the center of the disc, and fold the disc over on itself so that the color or flavor is enclosed in the center of the fondant ball.

Begin to knead the ball of fondant just like you did before. As you work it, you will begin to see streaks of color coming through from the center. Continue to knead until the streaks are gone and the fondant is a uniform color. Your fondant is now ready to be used or stored as outlined above.


Baking Cooking Food Popular

Double-Maple Cupcakes (and Cupcake Barf)

So I’ve basically lost my voice from screaming because Bakerella — THE BAKERELLA — commented on my blog.  As if I couldn’t love her more, she actually read my post and…her favorite color is turquoise.

Now that Danielle and I are all Hollywood and are basically just waiting for an invitation to bake with her, I decided to take a baby step toward cake pops and to bake some cupcakes on my own. If you’re training for a marathon, you build up to it.  Are you in fifth grade and would you like to read about baking? If so, this is the site for you!

The challenge: Double-Maple Cupcakes from Cooking Light. Except that I made them single-maple because I wanted to use buttercream frosting. I was first introduced to these cupcakes by my friend Christine, who is appropriately Canadian, and who baked them and brought them to work. They were the most fabulous cupcakes I had ever tasted, and I wanted to eat all 18 of them but had to just smile politely as co-workers passed them around and helped themselves to what could have been added to my portion.

Here is what I learned from this baking experience:

1. If you put a several cups of flour in the bowl of your KitchenAid mixer that you have used twice since you purchased it, and then turn the dial to High, you will distribute flour all over yourself and the kitchen. I also used a dough paddle which may have been wrong.

This would be an inappropriate picture for a food blog.

2. After you have done 1, you may no longer have the correct proportions of ingredients in your batter, and sometimes when this happens, your cupcake may actually throw up.

Cupcake barf. Unretouched photo.

Overall, though, most of the cupcakes that were not unwell turned out pretty normal looking.

Normal looking cupcakes
The ones that didn't throw up.

And they frosted up nicely.

Frosted cupcakes
I know there are gaps in the frosting. Don't judge me.

So if you want to try this at home, here are the recipes (with instructions on how to make barfing cupcakes above):

DOUBLE-MAPLE CUPCAKES from Cooking Light:
Ingredients

  • 1/2 cup granulated sugar
  • 5 tablespoons butter or stick margarine, softened
  • 1 teaspoon vanilla extract
  • 1/2 teaspoon imitation maple flavoring
  • 2 large eggs
  • 1 1/4 cups all-purpose flour
  • 1 1/4 teaspoons baking powder
  • 1/4 teaspoon salt
  • 1/4 cup 1% low-fat milk
  • 1/4 cup maple syrup
  • Frosting:
  • 3 tablespoons maple syrup
  • 2 tablespoons butter or stick margarine, softened
  • 1/2 teaspoon vanilla extract
  • 1/2 teaspoon imitation maple flavoring
  • 1/8 teaspoon salt
  • 1 3/4 cups powdered sugar

Preparation

Preheat oven to 350°.

To prepare cupcakes, beat first 4 ingredients at medium speed of a mixer until well-blended (about 5 minutes). Add eggs, 1 at a time, beating well after each addition. Lightly spoon flour into dry measuring cups; level with a knife. Combine flour, baking powder, and 1/4 teaspoon salt in a bowl, stirring well with a whisk. Combine milk and 1/4 cup maple syrup. Add flour mixture to sugar mixture alternately with milk mixture, beginning and ending with flour mixture; mix after each addition.

Spoon batter into 12 muffin cups lined with paper liners. Bake at 350° for 20 minutes or until a wooden pick inserted in center comes out clean. Cool in pan 10 minutes on a wire rack; remove from pan. Cool completely on wire rack.

Ingredients
  • 1 cup unsalted butter (2 sticks or 1/2 pound), softened (but not melted!) Ideal texture should be like ice cream.
  • 3-4 cups confectioners (powdered) sugar, SIFTED
  • 1/4 teaspoon table salt
  • 1 tablespoon vanilla extract
  • up to 4 tablespoons milk or heavy cream
Preparation
  1. Beat butter for a few minutes with a mixer with the paddle attachment on medium speed. Add 3 cups of powdered sugar and turn your mixer on the lowest speed (so the sugar doesn’t blow everywhere) until the sugar has been incorporated with the butter. Increase mixer speed to medium and add vanilla extract, salt, and 2 tablespoons of milk/cream and beat for 3 minutes. If your frosting needs a more stiff consistency, add remaining sugar. If your frosting needs to be thinned out, add remaining milk 1 tablespoons at a time.

Baking Food Popular

Popstruck

With all this talk recently about Santorum and the presidential election, there’s only one thing on my mind: CAKE POPS. Take a look at the Kermits below (by the amazing Bakerella). They are MADE OF CAKE. On a stick. That is what a cake pop is: cake on a stick, and apparently, incredibly, magically manipulated to look like Muppets.

Image courtesy of Bakerella

I know, I know, I’m a little slow on the uptake. It’s just like years after Brad Pitt was named one of People Magazine’s Sexiest People and I finally saw A River Runs Through It and started telling people, Hey, that Brad Pitt, he’s kind of cute!

This all started a few weeks ago when I was at a baby shower. Melissa V decorated the shower with Very Hungry Caterpillarstuff like little trees with caterpillars in them made of pom poms and other stuff I would never think to do (she also makes full-size nativity sets for plays and has a lot of children, which I would never do either), including:

Very Hungry Caterpillar Cake Pops
Some cake pops I did not make.

Yes, cake pops. The picture is blurry because I was high on sugar and shaking from all the cake pops I had. I would never have given them a second thought except that they were DELICIOUS. I kept eating them. I couldn’t stop thinking about them.

A late night Google search on cake pops invariably led to a visit to Bakerella, and hours ogling her photos (she takes gorgeous photos, which means she is doing with one hand what I cannot do with two. I am a bad baker. I’m an excellent eater, and I like my own cooking, but there is something about baking that compromises my ability to function. A few weeks ago I made some dipped truffles I was going to gift, and my husband said, “Uh, you can’t give those to your boss.” I would have been mad except that they did look like sad, decapitated snowmen after a nuclear war.). I had a full-on night of dreams about cake pops (mostly about how I made them for one of my kids’ birthdays, and when they were unveiled there would be gasps and some people would actually pass out from the awesomeness and a spotlight would shine on me, suddenly cueing R Kelly’s I Believe I Can Fly). Then I had to post about her on Facebook.  And that’s when I found out that my friend Danielle is obsessed with her too. Danielle can actually bake and has even made cake pops. And ebliskiver, but that’s a topic for another time. Anyway, this is what went down:

ME: So I was reading her FAQs and she’d like you to ask for permission to use her pictures SO I EMAILED HER!  What if she writes back!!!  Do you want me to ask her what her favorite color is???

DANIELLE: WHAT IF SHE DOES WRITE BACK!?!?!?  PLEASE forward it to me so I can be starstruck!!!!  It’ll be like you are famous along with her.  Ask her what her favorite NON-baked good food is.  Like does she eat steak?  Or stuffed mushrooms?  Or….Nachos?

ME: SHE WROTE BACK!!!!!  She actually typed letters back to me that were addressed to my email address!!!!  Here it is. Don’t faint.

On Wed, Jan 4, 2012 at 5:55 PM, Bakerella wrote:
Sure. Thanks for asking.

Bakerella

DANIELLE:  Ok, so basically you’re famous. Seriously though.  My heart is kind of beating a little faster than normal bc of her email to you. Did yours, too, when you saw her email in your inbox???????  Who else can we have you email?  WHO ELSE?!

ME: Selena Gomez?!? E.T.???

Then it basically degenerated into a conversation about feelings regarding Justin Bieber (who I happen to love).  But THEN Danielle went to the store and BOUGHT US CAKE POP DECORATING STUFF! YES, we are going to make cake pops!!! This is important because I cannot do this alone.  This is not going to happen for a couple of weeks, but be prepared. It is going to be EPIC.  Like we are optioning movie rights now.

Maybe Bakerella could link to me when she needs to show what could go wrong if you screwed up her recipes. In case you thought I was joking about being a bad baker, let me share this photo with you. I even took it with a fancy camera and a pensive angle, but these are carrot muffins and, like snowflakes, no two look exactly alike. In fact, they’re not even near the same size or shape.

Carrot Muffins
Nothing says "professional" like muffins that are baked from containers of the same size but come out totally different

So Bakerella, thanks for letting me use your pictures. They will make this site a happier place. Oh, and she has a bookout too — we’re going to be using it as the basis for our epic baking endeavor.