Author Archives: Sandi

Instant Pot Chicken Soup for Flu

Raise your hand if you rang in the new year with the flu. OK, put it down because that probably hurt if you’re sick. It seriously feels like everyone has the flu. We had it on a 38-hour journey back from Africa, and if you’ve ever wondered what hell is actually like, fly with the flu while watching the sky map on the monitor move less than one pixel per minute. And then have your daughter puke in the car ride on the way home. Happy new year!

Ok, I can’t really complain though because we were on safari in Africa, and — lion cubs. More on my Instagram account.

I’m only starting to feel half human at this point, so I’m going to keep this short, and write it on a blog so that I don’t have to use my actual mouth. Everyone knows that there’s nothing better (except maybe Tamiflu) to have on hand than chicken soup when you’re feeling like crap. But not everyone has a mom in the house that can make it for them. All the prep for this can be done while sitting; you throw it in the pot, and walk away. I use an Instant Pot pressure cooker (because I use it for everything nowadays), but you can also just put it on the stovetop on simmer for an hour and a half or so, til the chicken’s tender. Either way!

INSTANT POT CHICKEN SOUP FOR FLU

Ingredients

4 chicken drumsticks or bone-in thighs
2 tomatoes (I used Roma)
6 carrots chopped and peeled
3 ribs celery, cut into 1/2 in pieces
2 cloves garlic
1 diced onion
10 cups water
Two 1/4 inch slices ginger
1.5 TBSP salt or to taste
(if available): one date

Instructions

Put in pot. Set to manual pressure 30 minutes. Go lie down or moan in misery.

When cycle is complete, release pressure. Take out chicken and put on plate; with two forks, pull the meat off the bone and put back into the pot. Eat alone or add in cooked rice or noodles for extra bulk.

Feel better!

{Guest Post} Father’s Day Gift Idea: Custom Shirts

The last time my husband wanted to do a guest post on my blog was…well, never. But he somehow developed a sudden and unexpected passion for custom shirts that he wants to evangelize unto the world, in time for Father’s Day. I guess I never realized the non-custom-shirt-misery in which he lived until now.

So here it is, folks. My husband’s detailed account of his foray into the world of custom shirts. May it bring you unbridled tailored joy.


“Hey – can I do a guest post on your blog?”

“Hm. What about?”

“Custom shirts.”

“Why? How many did you buy?”

“They are for my job. [Deploying her own tactics against her] I would have lost money if I didn’t buy them.”

“That is only relevant when there is a sale.”

“Wait … Here’s an Anthropologie gift card?”

“Fine … but you’re not as funny as I am so I’ll have to edit your post.”

When your wife is the type who understands the pricing dynamics multiple industries, it’s really hard to buy her presents (“Do you realize what the mark-up is on these roses?!”).

I am guessing some of you struggle with what to buy dads for Father’s day, so I wanted to share my experience buying tailored shirts online. It’s a little more involved than picking a gift off the shelf, but I highly recommend it as a special gift that keeps on giving. 

I hate wearing off the shelf long-sleeved shirts. For 4 reasons. 

Reason #1: because of “the Sail” (the shirt bellows when you lean forward)

The Sail

Reason #2: Because I always lose the “Arm-Hair Game”

(game rules: people secretly take a guess at how hairy someone’s arms are, then they find ways to get them to raise their arms. “Can you reach that for me?” … if the sleeve is too short, the shirt sleeve rides up, revealing the answer. At least that’s what I imagine people do)

Hairy! I knew it!

Reason #3: Because of “The Vent Game” (arm motion untucks shirt and exposes skin on side. A variation of the “Arm-Hair Game”)

The Vent

Reason #4: Because of “The Dress” (shirt is too wide around the belly, makes the shirt look like a dress just above the belt … closely related to “The Sail”)

The Dress

Last year, I gave buying online a try, primarily on eBay because they provide some measurements. So I measured my overdeveloped chest and other well sculpted body parts. I included NWT in the search bar (New With Tags). The shirts were a bit better (and cheaper), but I had to send some back, because of the loose definition of New.

NNWT (Not New, With Tags)

(I unfortunately no longer have the photo … it was gooood! Tag was completely shriveled up compared to the new one)

But I still couldn’t get rid of the problems. So, I decided to give tailored shirts a go.

I tried 4 sites, ranging from high end to value pricing:

  • J Hilburn (a person comes to a place of your location to measure … Shirts are $150+)
  • propercloth (the most aggressive marketer on Google … $95+, but most are $140)
  • ownonly (~$89+)
  • tailor4less (the value player … $60+)

After weeks of trial and error, HERE ARE THE RESULTS!

1ST PLACE (and where I bought 8 shirts): tailor4less

  • The shirts fit almost perfectly out of the box. The sleeves could be a bit shorter, but I think I am compensating for a lifetime of living with sleeves that are too short.
  • The quality is great (or at least, not noticeably different compared to J Hilburn, the premium player).
  • The selection is not huge (compared to J Hilburn), and some of the styles are questionable, but I found what I wanted.
  • Nothing fancy with the packaging … just good shirts.
  • The model and I have exactly the same, slim body types…right?

Screen Shot 2016-05-30 at 11.29.26 AMIMG_5577


2ND PLACE: J Hilburn

  • High quality shirt (though I didn’t think it was 3 times better than the tailor4less shirt) …
  • … in a super fancy box …
  • …hand delivered by a knowledgeable stylist.
  • Premium pricing (mine ending up costing $180 … The stylist recommended some custom buttons, which added $20 I think. I went with her recommendation … the shirt turned out nice).
  • Tied with tailor4less on the quality of the fit.
  • Best selection of patterns.

NOT FOR ME / DISQUALIFIED: proper cloth

  • The best web experience of them all (great website, and email tracking).
  • Didn’t like the fabric of the shirt (Sandi:“Is that a burlap?”) … I am sure they have others, but for the material to be that rough made me question the quality of the other shirts.
  • The fit was way off, not even close. 
  • Good customer service … issued a refund no questions asked.

DON’T TOUCH WITH A BARGEPOLE / DISQUALIFIED: ownonly.com

  • I am reserving the last portion of this post to recount my experience.
  • The shirt quality was ok.

So, how does it work? 

If you go with a provider that doesn’t have a stylist (e.g. tailor4less.com)

  • Go to their website.
  • Before you do anything else, check their return policy. Look for “returns accepted” … if you don’t see it, I recommend you don’t buy.
  • Take 8-10 measurements (I had Sandi do it … I didn’t think it was particularly hard … you’ll need a tape measure, and possibly a stool if your measurer is much smaller) … interestingly, each site measures slightly different things … because I sampled a few sites, I (well, Sandi) took ~20 measurements in total.
  • Make your shirt selection … there are all kinds of options on collars, fit etc… I found these pretty straightforward. There are helpful hints on what type of collar is better suited for what type of face, the benefit of shoulder pleats etc…
  • Pick your fabric / pattern … I tried getting samples mailed to me, but those weren’t available with the vendors I tried.
  • Wait ~2 weeks (the shirts I tried are made offshore. China, Philippines etc…).
  • Receive / Open package … It’s fun to see how each provider wants to be perceived here … Some had fancy boxes, others just came in a beat up DHL package. I am not the type that needs a box to feel good about my shirt.
  • Try on your shirt.
  • If it doesn’t fit, then adjust measurements / provide feedback, then send back, then wait two weeks. Check that your provider does alterations and shipping for free (most seem to).

If you go with a stylist (e.g. J Hilburn)

  • On their website, look for a stylist in your area.
  • If they have more than one, I would recommend you talk to a few. You are going to be spending a fair bit of time talking to them, so check for compatibility. Ask them lots of questions, like what’s the process like, what they offer, what happens if it doesn’t fit, pricing etc… Through the conversation, if you feel comfortable with them, then it’s likely a good match. I made the mistake of not doing this, and though the stylist was knowledgable about the product, we didn’t jell well. As I reflect on the experience, that had a pretty big impact on my decision not to move forward.
  • Make an appointment (mine would come anywhere I wanted).
  • The stylist makes a bunch of measurements. I didn’t think my stylist did a significantly better job than Sandi. The process takes about 45mins by the time you talk options etc…
  • Pick your fabric and style … the good thing here is that you can see samples.
  • Wait two weeks … the stylist comes back to your house for a fitting.
  • If it doesn’t work, then they take pictures of the current fit, perhaps a couple of measurements, and take the shirt back.
  • Wait two more weeks … the stylist comes back for hopefully the final fitting.
  • You can then decide to order more … good news is that you don’t need to do any more fitting!

So was it worth it?

Yes. Without a doubt.

I CAN’T WAIT to wear my custom shirts. I am giddy when they come back from the cleaners, because it means I get to wear them soon. I get excited during the day when I am wearing them. I might occasionally take a break from working just to wave my arms about (I get delight knowing that there will be no game winners out there).

And for $60! I was paying almost $40 for the NWTBANNWT eBay shirts (New With Tags But Actually Not New With Tags), so $20 more for something new that fits perfectly is awesome.

The final product

Rhymes with Chiselled

Nice shirt!

You seem familiar ... are you an online custom shirt model by any chance?

Limited "Sail"

So, to ownonly.com.

When the shirt arrived, I found that it was too narrow. It stretched across my perfectly formed upper body (Sandi: “nice boobs, sir”). The sleeves were also a tad too short.

There's no way around it ... those are tits, dude.

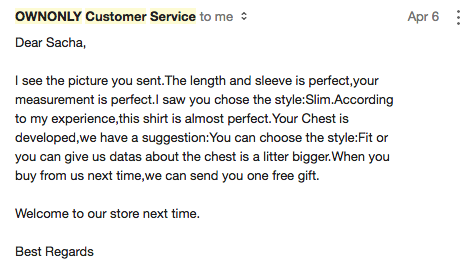
So I sent feedback, and got this:

Screen Shot 2016-05-30 at 11.35.45 AM

My first thought was “”Eligible”? uh oh … so it’s up Angie to decide?”

Angie asked me to go to a local tailor for an alteration (she said they would reimburse up to $79). I responded that the shirt was too small, that there is no extra material in the shirt, so wasn’t sure why I would go to a tailor. 

After that, it was all fun and games.

Screen Shot 2016-05-30 at 11.38.55 AM

Ooooohhhh, so it was me that was wrong! Of course, the shirt is perfect! And they recognized my “developed” chest. Note that I picked slim fit from all the other providers. But I’m wrong anyway!

But there’s more…they did give me the opportunity of buying from them again…not sure why I deserved to, but hey! Free non-descript gift! 

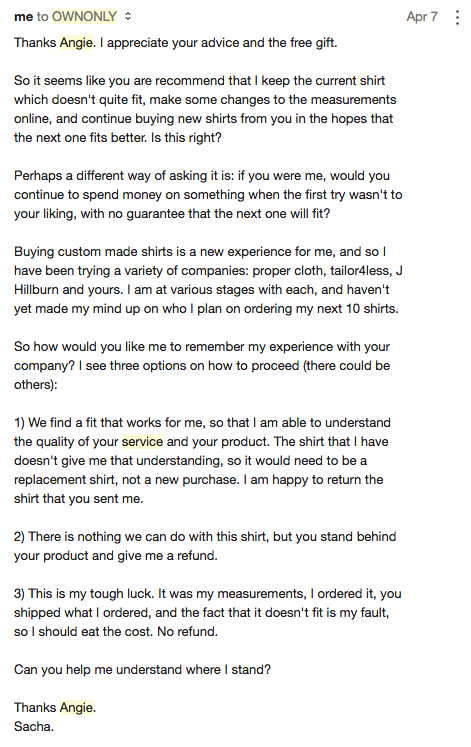
I slowed things down, a trick I learned from my dad.

Screen Shot 2016-05-30 at 11.43.03 AM

It took two follow-ups and 14 days for the Lords of Ownonly to grace me with a response. 

Screen Shot 2016-05-30 at 11.43.53 AM

For next time, when I decide not to buy from them, at least I’ll know how to buy from them.

But perhaps it’s me? Perhaps there is such a thing as a bad customer? “Bad customer! Shirt don’t fit you right! Bad measurer of body parts ! Bad evaluator of how shirt fit! Bad!” Perhaps we can find a reason to also blame the measurer! As an aside, I am open to your suggestions on what to do with responses such as these.

Anyway, did I mention that I LOVE MY SHIRTS?!?

I highly recommend getting a custom shirt for a father out there … he’s going to love it!

And thanks for reading Sandi’s rewrite of my review! 🙂

Ajiaco

It’s hard to believe that it’s been 7 years since my trip to Colombia, and it feels like almost 7 years since I’ve posted. It’s all good though…I’ve been busy living my offline life. It’s been a little over a year since I jumped ship and became my own boss again, which has been fantastic and full of wonderful people and interesting work. I’ve been shuttling people around to volleyball-related things. I injured my knee and recovered (with the assistance of the physical therapists for the Padres…perhaps just a little overkill for my esteemed neighborhood running career). And we just got off of FaceTime with my 3-year-old niece who calls us when she needs to be coached through pooping. I’m so glad she thought of us.

We got some winter beach days in too, which is always nice — I love it when the beaches are pretty empty.

This springy time of year always reminds me of Bogota for some reason, and the delicious soup that we ate at our hosts’ farm, serenaded by peacocks. Ajiaco is a Colombian soup in a delicious broth, with a hearty helping of vegetables. The potatoes they use in Colombia aren’t available here, as far as I can see, but we can get pretty close. Spring is such a hybrid type of season that ajiaco — with its mix of rich broth and fresh ingredients — seems a perfect fit.

AJIACO by Tania Sigal from Fine Cooking

For the soup:
  • 3 lb. cut-up chicken, skin removed, rinsed well
  • 1 large white onion, peeled and cut into quarters
  • 1 leek (white and light green parts only), cut into 1-inch rings, and rinsed thoroughly
  • 1 green bell pepper, seeded and cut into 1-inch pieces
  • 2 ears fresh corn, cut crosswise into quarters
  • 2 ribs celery, cut into 1-inch pieces
  • 2 large carrots, peeled and cut into 1-inch pieces
  • 3/4 lb. Yukon Gold potatoes, peeled and cut into 1-inch cubes
  • 3/4 lb. Idaho potatoes, peeled and cut into 1-inch cubes
  • 3/4 lb. small red potatoes, peeled and cut into 1-inch cubes
  • 6 cloves garlic, peeled
  • 1/2 cup fresh cilantro leaves
  • 2 chicken bouillon cubes
  • 1 Tbs. kosher salt; more to taste
  • 1/2 tsp. ground black pepper
For the aji:
  • 4 scallions (white and light green parts only)
  • 1 medium tomato, peeled and seeded
  • 1 small white onion, peeled
  • 2 fresh Scotch bonnet or habanero chiles or 2 fresh hot red chiles, stems and seeds removed (wear gloves, and don’t touch your eyes)
  • 3 Tbs. fresh cilantro leaves
  • 3 Tbs. white vinegar
  • 1/4 tsp. kosher salt
For the garnishes:
  • 2 ripe avocados, peeled and cut into 1/2-inch cubes
  • 1 cup sour cream or crème fraîche
  • 1/2 cup nonpareil or other small capers, rinsed and drained (if using large capers, chop them coarsely)
  • 1/2 cup chopped fresh cilantro leaves
Make the soup:

Put the chicken in a large (at least 8-quart) stockpot and add 8 cups water. Bring to a boil over high heat and then reduce the heat to a vigorous simmer. Simmer for 10 minutes, frequently skimming off the foam that floats to the surface.

Add all the vegetables, the garlic, the cilantro, and the bouillon cubes to the pot, along with the salt and pepper. Stir a few times to distribute the vegetables and submerge as many of the solids as possible. When the broth returns to a gentle boil, partially cover the pot and simmer, stirring once or twice, for 1-1/2 hours. Taste for salt and add more if needed.

Using tongs or a slotted spoon, pick out the chicken pieces and put them on a large plate. Stir the soup with a large spoon, breaking up some of the potatoes to thicken the soup slightly. Keep hot if serving soon or let cool and refrigerate.

When the chicken is cool enough to handle, pull the meat off the bones and shred it by hand. Discard the bones and tendons, and put the shredded chicken in a serving bowl.

Make the aji:

In a food processor, pulse all the aji ingredients until they’re finely minced. Transfer to a serving bowl.

Serve the ajiaco:

Put the avocados, sour cream or creme fraiche, capers and cilantro leaves in small bowls and set them on the table along with the bowls of shredded chicken and the aji. Reheat the soup if necessay and ladle it into large soup bowls, putting a quater ear of corn in each bowl. Let your guests add the garnishes and the aji as they like.

Make Ahead Tips

The soup and the aji can be made a day ahead. If the soup is too thick after it’s reheated, thin it with a little water.

Jasmine Brocade Tea – FarLeaves

I am loving this cooler weather because it gives me an excuse to wear sweaters — like my favorite swing-style sweater with tennis rackets on it (which only implies that I play tennis, despite the fact that this is the first time this year I have used the word “tennis”). Sweater season is so short in southern California that I have to take full advantage of it…and so I have. Since I work from home most days and appear to people only via videoconference, I’m able to embody the mullet of outfits. Today’s mashup: cashmere sweater with statement necklace up top; fleece lined sweatpants and fuzzy slippers on the bottom.

The other amazing thing about cold weather is cradling hot drinks. I placed a Christmas order with Far Leaves Tea recently, because 1) it’s served in Michelin-starred restaurants like Quince and Chez TJ, and I do not currently have access to a Michelin-starred restaurant so this will do; 2) it was featured in this year’s New York Fashion Week, which I also do not have access to, with much fanfare, and 3) my sister-in-law just joined their team. Also, did I mention that it’s served by tea sommeliers in high end restaurants (hm, tea sommelier, has a nice ring to it. Perhaps a future career.)? And that Google brought them in to train them on how to properly brew tea?


One of the things that arrived was a beautiful gift box wrapped in a bespoke Far Leaves tea towel. Inside was this:

Those little balls on the left are Jasmine Brocade tea. When you add water to these little guys, they start to blossom:

unfurling slowly:

til they’re in full bloom:

Wanna see it in action? Watch here:

This added a touch of sophistication to my otherwise sweater-sweatpants day. The best news? FarLeaves has kindly offered a promo code to share with my readers! Enter code xmas15 at checkout to get 10% off your online order. Because I can’t think of anyone who wouldn’t want tea like this!

Happy brewing!


How to Make Bone Broth in a Slow Cooker

Every once in a while, things I grew up with in my Chinese-American household manage to become the latest craze. Supplementary math books, growth mindset, and now: bone broth.

I’ve read tales of people queuing for these magical cups of inflammation-reducing, hair-skin-and-nail-enhancing elixir. While those appear to be attractive benefits of drinking broth, there’s another good reason to give it a try: it tastes really good. And after I have broth, I feel really good.

I’ve been drinking a lot of broth lately because I have a bum knee. For years, running has been my outlet for stress and my ticket to a decent night’s sleep, but years of aggressively pounding on concrete is finally catching up with me. I’ve had pain off and on for a couple of years now, but I really can’t run without pain anymore, and now it’s starting to hurt sometimes when I walk (never mind the gross popping sound it’s making now too). I’m seeing a doctor tomorrow, but for now, broth tides me over.

Sipping broth is a spiritual experience. It feels to me like serenity and replenishment. In our crazy lives there are so few things in life that we can control, so when there are opportunities to create serenity — in my case, like buying a really quiet dishwasher and oven. Broth is way cheaper than either of those!

My daughter made an Asian-style broth in a slow cooker; check out the video below to find out how!


SLOW-COOKER BONE BROTH

Ingredients

  • 1-2 pounds of bones (I like to use a mix of bone types, like chicken and pork; make sure you have a mix of meaty bones and bones with tendon and cartilage, so you get both flavor and collagen into your broth. I save my bones from roasts in the freezer for when I’m ready to make broth.)
  • 1 whole onion, peeled and cut in half
  • 1 head of garlic, cut in half horizontally
  • 1 TSBP whole ginger root
  • 1 cup shitake mushrooms
  • 1 TBSP vegetable oil
  • Water

Heat the vegetable oil in a saute pan and sear the onion and garlic til browned. Keep them in big chunks as cut so they’re easier to fish out after cooking. Add to slow cooker. Add in bones, ginger and mushrooms, and fill the slow cooker pot with water until just 1 inch below the upper rim.

Cook for 1 hour on high and then 15-23 hours on low. Occasionally skim fat and other matter that floats to the top off the surface of the broth (I find that when I use bones from previous roasts, there’s very little cloudiness to the broth and you don’t have to worry about skimming much. I also prefer the flavor from pre-roasted bones).


Take out the solids (or pour the liquid through a strainer into a large bowl), season with salt as desired, and enjoy! If you want to keep an ongoing broth factory, just keep adding water, bones and veggies (feel free to experiment!) to leftover broth and cook — the flavor will become more complex over time.


Gluten-Free Banana Chocolate Muffins

I don’t know about you, but I’m pining for summer. We had a lovely, temperate summer here in San Diego and have been suffering through a heat wave for the past couple of weeks. Suffering, I say! Because we San Diegans cannot stand temperature fluctuations greater than +/- 3 degrees.

How was summer for you? It was my first summer in my new life as an independent consultant, which meant that I got to do interesting work, but was still able to take the odd day off and spend a day at the beach with the girls. I’m loving this gig; it’s a privileged position to able to choose the work that I take on, and it helps me with setting boundaries — something I’ve never really been very good at doing.

Our big trip of the summer was up to Lake Tahoe, where we had a family reunion with three generations of family from my mom’s side. My mom had 9 kids in her family, so when we have whole-family get-togethers, we usually take up a whole restaurant. This was a scaled-back gathering of the family that’s living the in the United States.

A lively bunch, they are.

The kids got to do what kids do…you know, making weapons out of sticks…

…and so on…

The lake was nothing short of amazing. Amazing! Clear! Sparkly! Here I am having one of the happiest moments ever, on a paddle board in the middle of this incredible view (photo credit to my cousin Jack!):

Plenty of kayaking and boating to go around too.

And some of us did some tree climbing on a ropes course:

The best thing we did (thanks to the spectacular organization skills of my sister-in-law) was to hire a private chef — Arica from Yummy Fixins — who was soooooooo fantastic. Not only was her food spectacular, but she and her assistant cleaned the kitchen before and after! If you are in Tahoe, it would simply be wrong not to hire Arica.

See those flourless chocolate cake slices in the back? I would fight you for them! The BEST I have ever tasted.

My brother was in charge of martini-making and photo bombing:

My cousins and I used to spend summers together hanging out, torturing one another and generally engaging in what is most accurately described as nonsense, so it was great to have an opportunity to gather us from all the corner of the country to do this all over again, across three generations.

After the reunion, we made our way back down the California coast. If I am ever a cow, please make me a Big Sur cow. They have the most amazing views.

I’ll do a roundup of the coastline drive in another post, but that’s just a taster…isn’t it lovely?

Ah, thanks for allowing me to relive one of the highlights of summer. And now, back to real life. The kids are back in school, we’ve got multiple Google Calendar carpools going on, and a middle school kid in the mix.  Our mornings are rushed and the easiest meals are often cereal, so that’s the go-to for the kids.

I’ve been adding these gluten-free banana chocolate muffins into the repertoire lately. Now, we all know that I’ve got nothing against gluten, being that I bake my own bread. But these are so easy to make, don’t require a ton of ingredients, and they always, always come out moist. We’ve made a little video below, with the full recipe under the video. Hope you enjoy these — cheers!


GLUTEN-FREE BANANA CHOCOLATE MUFFINS

Ingredients

  • ¾ cup coconut flour
  • 6 eggs
  • 3 ripe bananas, mashed
  • ½ cup raw honey, at room temperature
  • ¼ cup melted coconut oil
  • 1 teaspoon vanilla extract
  • 1 teaspoon baking soda
  • 1 teaspoon chia seeds
  • ¼ teaspoon salt
  • 1/2 cup semi-sweet chocolate chips

Preparation

  1. Preheat the oven to 350F and line a standard muffin tin with 12 baking cups.
  2. In a large mixing bowl, combine the all ingredients except for chocolate chips. Use a spatula to mix well; then fold in the chocolate chips.
  3. Divide the batter among the 12 cups, then bake at 350F for 23-25 minutes, until the edges are golden the centers of the muffins feel firm to a light touch. Allow the muffins to cool for at least 20 minutes before serving.
  4. Store these in the fridge if not eating immediately.

Makes 12 muffins.

#seesummerbetter with Warby Parker

When the folks at Warby Parker invited me to try their sunglasses and share the way I experience summer, I squealed. Because:

1. I love glasses. I have terrible vision and in the animal universe I would be a mole. With glasses, I have overcome my genetic predisposition to be the one in the herd consumed by a lion.

2. I also happen to be covered in moles.

3. I love what Warby Parker does with their buy a pair, give a pair program.

4. It’s Warby Parker.

I tried 5 pairs of sunglasses:

Neville
Paley
Ames
Batten
Crossfield

and set about my summer business in them. I’ve been posting the pics to my Instagram account; here’s a roundup:

I spent an afternoon with my friend Alyson, where we had lunch at a new nearby eatery and then walked around the shops afterward. I can’t resist a pretty flower, so here I am helping myself:

Then we headed off to one of our favorite local gardens, where I wrestled the camera from her hands and took a shot of her wearing the Battens. After which I am just sitting.


My kids spend a lot of time at the ranch in the summer, so sometimes I help lead a horse to water (or other things that require neither skill nor grace).

No summer is complete of course without beach visits.

And sunsets.


And after all that running around, I love to just relax in my back yard with a good book.

How’s your summer shaping up? Feel free to share your own summer pics with #seesummerbetter!

Stone Fruit Tartlet

You guys.

Someone (who I used to work with and who used a gaming headset for work and once embarked on gathering customer feedback unknowingly calling people using the “space chipmunk” voice setting on his headset) shared with me what I am sure is the 8th wonder of the world.

Go into Google Hangouts and type in /ponystream . Go on, I’ll wait.

Welcome to your changed life! Maybe My Little Pony isn’t as big a deal at your house as it is in mine, but it takes up a lot of bandwidth over here. One of my kids has a Fiverr business where she will draw you in My Little Pony style as well as a YouTube channel dedicated to pony drawing.

Now that it’s summer we’re spending more time at the beach, but My Little Pony is always with us.

Plus a little beach volleyball.

And the other great thing about summer? Stone fruits. Loquats, peaches, apricots, nectarines…so sweetly wonderful right now.

You could just eat them raw. You wouldn’t be sorry.

But maybe sometimes you want get a little fancy. Feel a bit like the queen. For that, you should make a tartlet.

We got these tartlet pans for our wedding 14 years ago and I finally thought NOW IS THE TIME. I only really make simple recipes, so this is what I did.

STONE FRUIT TARTLET

Makes 6 4-inch tartlets.

Ingredients

Filling

  • 3 cups of pitted stone fruit, such as peach, loquat, or nectarine, chopped
  • 1/2 cup coconut palm sugar
  • 3/4 cup flour
  • 1/2 cup unsalted butter, chilled and cut into pieces
  • 1 cup rolled oats

Crust

  • 2 cups flour
  • 1/2 cup coconut palm sugar
  • 1 cup butter

Preparation

Preheat the oven to 350 F.

Crust: Mix the flour, palm sugar and butter with an electric mixer til crumbly, about 2 minutes. Press the mixture into six 4-inch tartlet pans, so that it’s about 1/4 inch thick. Bake for about 20 minutes, checking frequently after 10  minutes, til the crust is lightly browned.

Filling: While the crusts cool, raise the oven temperature to 400 F. Toss the stone fruits in a large bowl with 1/4 cup of the palm sugar and 1/4 cup of flour. Spoon the mixture onto the tartlet crusts.

Put the remaining flour and butter into a food processor and pulse until the clumps are about the size of a pea. Add in the remaining palm sugar and rolled oats and pulse to combine. Press the mixture over the stone fruits.

Bake until the stone fruits are tender and the topping is a golden brown. Serve with whipped cream or ice cream if desired.


Artisan Bread in a Bread Machine

Hey friends! It seems I’ve gotten around to posting around once or twice a month lately, but if you want more frequent updates, hacks and all the latest on all things food, join me here on my Facebook page where friends and foodies will regale you with their witty and insightful banter.

I once sat with a tarot card reader at a party who told me that I needed to do something creative and with my hands. (She also implied that I was going to come into some type of large fortune, but, unless she meant a pretty decent loquat harvest, so far, no dice.)

She was right though – I do get great satisfaction from working with my hands and am probably happiest when I’m working in the garden. There was an article recently about how microbes in the soil combat depression. I don’t know if it’s the microbes in the soil or the fantastic conversations I have with the fruit trees, but being barefoot and feeling connected to the Earth definitely does something for me.

Also not long ago, I read a piece in the New York Times about gluten sensitivities. While there are certainly people with bona-fide celiac disease who can’t tolerate any amount of gluten, there are also countless people who believe they have gluten sensitivities that can ultimately be attributed to other things, like commercial leavening ingredients and preservatives.

I’m certainly no expert on the subject, but I am a fan of simple ingredients, so I started making my own bread this past year. It’s been a long road but I’ve finally gotten to a point where I think my bread qualifies as delicious: fragrant, crunchy crust and a moist, stretchy interior with lots of big nooks and crannies to show off the glutinous fibers.

I am not a big fan of cleanup, so I use a bread machine to handle the autolyse (rest), kneading and rising.

I also start with a sourdough starter, which is a living thing and which I consider a pet (Pete!). The older your starter, the more developed and complex the flavors; we’ve had Pete for about 10 years now. Check out Pete’s awesome glutinousness!

But if you don’t have a starter, you can start with the poolish in the recipe below; if you want to make a starter, click here for a recipe and instructions.

I modified a recipe I found online, over time, as I like more moisture in my bread and a little more salt. 

ARTISAN BREAD WITH A BREAD MACHINE from Bread Experience with my modifications:

Poolish
1/3 cup (2 5/8 ounces) cool water (about 65°F)
1/2 cup (2 1/8 ounces) European-Style Artisan Bread Flour
1/16 teaspoon (a pinch) instant yeast

Dough
All of the poolish (above)
3/4 cup (6 ounces) cool water, about 65°F
2 1/2 cups (10 3/4 ounces) European-Style Artisan Bread Flour
1 teaspoon instant yeast
1 1/2 teaspoons salt

The poolish:

In a medium-sized bowl, combine all of the poolish ingredients, mixing just till a cohesive dough forms. Allow the poolish to rest, covered, for 12 to 16 hours at room temperature. When the poolish is ready to use, it will be filled with large holes and bubbles.

The dough:

Add the water to the poolish or sourdough starter, and mix till smooth. Add the flour, and the yeast (I add yeast here so that it gets mixed in and protected from the salt, which will come in later), mix till just combined, cover the bowl, and allow the mixture to rest for 20 minutes. This rest period (autolyse, in French) allows the flour to absorb the liquid and the gluten to start its development, making kneading easier and more effective. Add the salt, and knead the dough till it’s fairly smooth but not necessarily elastic, 5 to 7 minutes in a bread machine. (The gluten will continue to develop as the dough rises, so you don’t want to develop it fully during the kneading process.)

This is what the dough looks like when I get to this point. If it’s looking dry, add water just a couple of drops at a time so that it’s moist but not super wet. Sometimes depending on how the dough looks, I might end up adding up to another 1/4 cup of water.

Close the lid on the bread machine and let the dough rise for 1 1/2 hours. To help develop the gluten, distribute the yeast’s food, and expel any excess carbon dioxide, turn the dough every 30 minutes during the rising time: gently fold all four sides into the middle, and turn the dough over.

Transfer the dough to a lightly greased work surface, divide it in half, shape each half into a rough log, cover them, and let them rest for 15 to 20 minutes. Again, this gives the gluten a chance to relax.
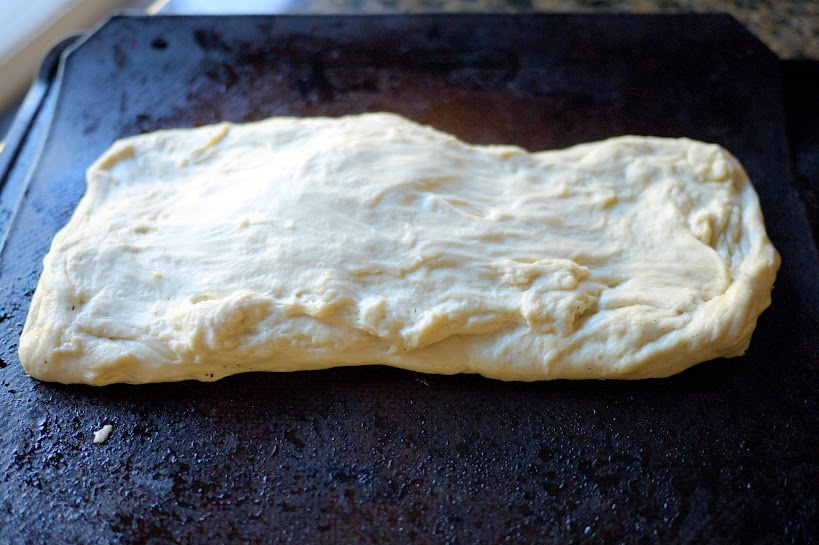
Shape the logs into batards (shorter and fatter than traditional French baguettes) or Italian-style loaves—tapered ovals about 12″ long. Place them on a lightly greased or parchment-covered baking sheet, cover them with an acrylic dough cover, stick them in an oven that’s off (that’s what I do, but I have two ovens), or gently with lightly greased plastic wrap, and allow them to rise, at room temperature, for about 2 hours; they should rise about three-quarters of the way to doubled. If they rise too much they’ll lose their shape in the oven, so be sure they don’t over-rise.

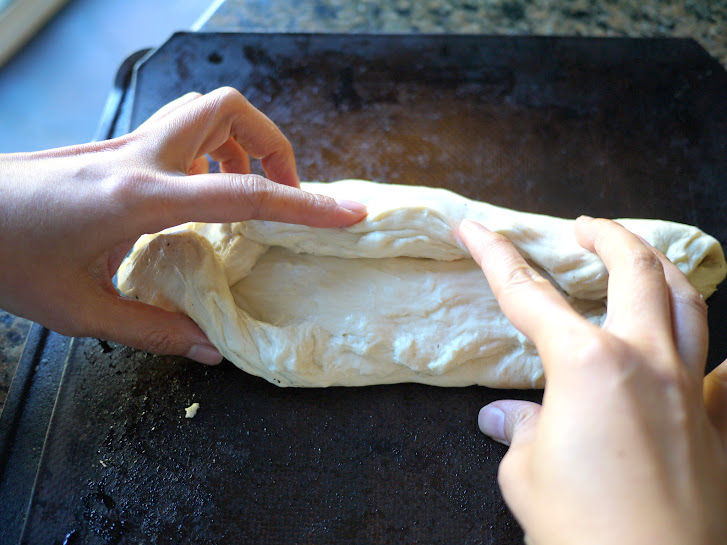
This is how I shape the dough:
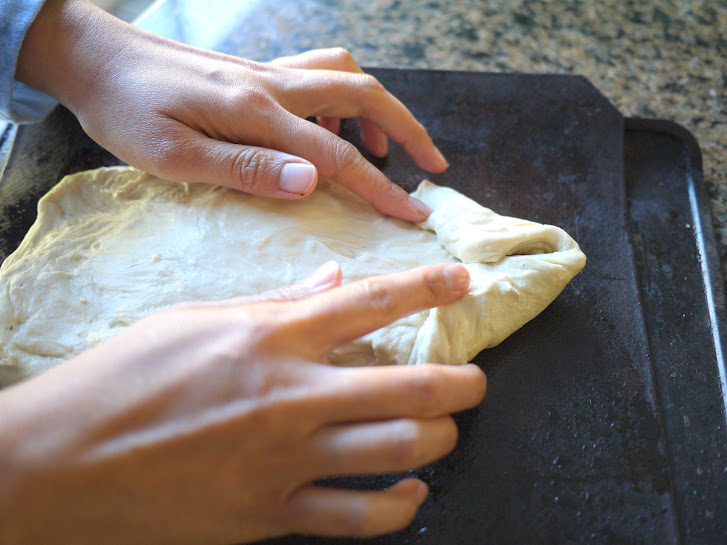
At this point I flip the log over so that the seem is on the bottom.

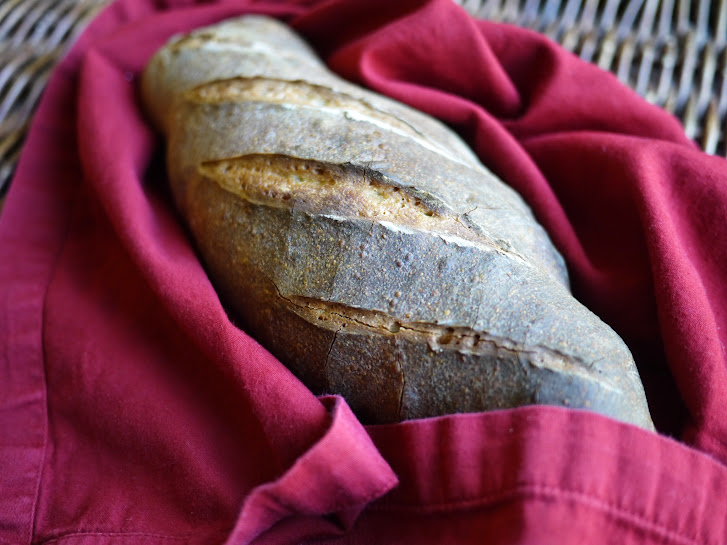
Using a sharp knife or razor, and holding it parallel to the dough*, make four slashes in each loaf. These should be more nearly vertical (running down the loaf) than horizontal (running crosswise), each stretching about one-third the length of the loaf. I find it easiest to do this with a serrated knife whose blade has been dipped in flour. Cut swiftly! Spray the loaves with warm water.

Preheat your oven to 425°F, making sure you give it plenty of time to heat; this bread needs to go into a HOT oven. Bake the bread for 30 to 35 minutes, or until it’s a deep, golden brown.

Note: European bread is generally baked longer than American loaves; if you’re uncomfortable with a very dark crust, reduce the baking time a bit. Turn off the oven, crack the door open about 4 to 6 inches, and allow the bread to cool in the oven; this will help it retain its crunchy crust.

Yield: 2 loaves.

*The blade shouldn’t descend into the dough at a 90° angle; rather it should slice under the surface at about 10° to 20°. This will allow the loaf to rise in a more attractive fashion as it’s baking.

I’ve also broken the dough into 4 mini-loaves, and baked them for lunch-sized portions. Recently, I’ve been adding on sesame and chia seeds — just sprinkle them on right after you’ve sprayed the dough with water, and bake as outlined above.

Tabbouleh

I am mobile blogging to you today from beautiful Torrey Pines State Reserve!

I decided to rely on my middle-aged brain instead of checking my calendar, so have arrived an hour early to meet a friend and still have time to kill after forcing myself to do a run. So mobile blogging!

Ok, timely info: it’s almost Mother’s Day, and I don’t know about you, but my mom is a big fan of saving money. Rejoice: my friends over at OpenTable let me know that you can enter to win one of 10 $150 restaurant gift cards! I entered of course, and I think you should too. Here’s the link; if you win, I also think that you should invite me, even if it’s not technically in OpenTable’s contest rules.

Now, next in the series on foods that are as much fun to say as they are to eat: tabbouleh! I love tabbouleh, and so does my younger kid — we just love the awesome texture of the bulghur wheat couples with the tangy goodness of lemon juice and the party that mint and scallions bring to the table.

Tabbouleh is also super easy to make. Here, my apprentice shows you how. It’s a fantastic make-ahead option too — tastes even better if you give the flavors time to develop.

The recipe that we use is from Alice Waters, in The Art of Simple Food:


TABBOULEH SALAD

Makes 4 servings.

Ingredients

1/2 cup bulgur wheat

11/2 large bunches parsley (about 11/2 cups chopped)

1 bunch mint (about 1/3 cup chopped)

1 bunch scallions, white and green parts (about 1 cup chopped)

2 ripe medium tomatoes, cored and diced small

Juice of 1 lemon

Salt

1/4 cup extra-virgin olive oil

Preparation

To prepare bulgur: Place bulgur in bowl. Alice says to add cold water to cover by 1 inch, but I add boiling water — I like the tabbouleh a little softer. Soak for 20 minutes or until grains are plump. Drain in sieve.

To mix salad: Meanwhile, in large bowl, combine parsley, mint, scallions and tomatoes. Using hands, squeeze soaked bulgur to remove as much water as possible. Mix bulgur into chopped herbs and tomatoes. Add lemon juice, salt and olive oil. Mix well. Taste and add more salt, lemon juice or oil if needed. Let rest for 1 hour before serving to allow bulgur to absorb flavors.