Tag Archives: recipes

Cooking Food

Gingered Kale and Bok Choy


Our friends Lew and Kim from business school were coming out west with their kids for spring break, so I wanted to start thinking about the food.

Me: Anything you guys don’t eat? I was planning on cow eyeballs wrapped in bacon but just wanted to check.

Lew: We only eat wild grown grass-fed eyeballs.

We were planning a day at the pool so I had to prep a meal that wouldn’t require too much work once we got back. Our local farm is bursting with kale and bok choy, and so is my fridge, so I went for this quick and simple but healthy and tasty side dish. I’m sad to say that I served it with steaks that did not come with eyeballs in the package.

You’ll need some bok choy, kale, ginger root and cilantro:

I prepped the kale ahead of time by separating the leaves from the tough center rib. Just hold it upside down by the stem and run a sharp knife along either side of the rib. I like to pretend when I’m doing this like I’m an ER surgeon. So I am deft, decisive and quick. But not too quick. Better to be the surgeon than the patient.

Chop up the kale and bok choy into rough 1-inch pieces. Mince a tablespoon of ginger, and finely chop a 1/4 cup of cilantro.

That’s all the prep! Now you can go to the pool with your friends fully dressed and take pictures of them from the sidelines because you refuse to get into the water unless it’s 100 degrees outside:

And then come back and look longingly at these glasses because two years ago you developed a tragic allergy to red wine.

So you might as well start cooking. Heat up some oil in a pan over high heat — I’m Chinese, so I have to use a wok. When it’s nice and hot, throw the ginger in and let it cook for about 30 seconds. You will see that the ginger appears to be delighted to be swimming in an oil bath, and may jump around a bit.

Next, toss the bok choy and kale into the pan, stirring quickly and constantly. Sprinkle a pinch of salt over the greens while they’re cooking.

Add in a teaspoon of low sodium soy sauce and cook for another minute, stirring the vegetables constantly to prevent burning. Off the heat, throw the cilantro on top and mix in with the kale and bok choy. Remove from pan and serve immediately. Maybe even outside, with people trying to eat normally while you are photographing them.

In this next picture I instructed them to “smile like you’re on an organic farm.”

Got any other suggestions for ways to cook kale or bok choy? Would love to hear them!

GINGERED KALE AND BOK CHOY

Ingredients

  • 1 bunch of kale leaves, center rib removed and chopped into 1-inch pieces
  • 1 large head of bok choy, or 5-6 heads of baby bok choy, chopped into 1-inch pieces
  • 1 TBSP ginger root, minced
  • 1/4 cup cilantro, chopped fine
  • 1 TBSP vegetable oil
  • 1 tsp soy sauce
  • salt to taste

Preparation

Heat oil over high heat in a wok or frying pan until shimmering. Add in ginger and cook for one minute. Add in the kale and bok choy, stirring constantly to prevent burning, cooking until leaves just turn a vibrant green. Sprinkle in a pinch of salt.

Continuing to stir, add in the soy sauce and cook for another minute. Off the heat, stir in the cilantro and transfer to a serving dish. Add salt if desired. Serve immediately.

Serves 4-6.
Cooking Food Popular

Savory Bacon Kale Frittata

I’m still reeling from the shock of not having won the lottery, and, $500 million poorer than anticipated, headed back into the kitchen where I am destined to spend every evening (at least until I win the next one).

I love breakfast, lunch and dinner and everything in between, but there’s something I especially love about a leisurely breakfast, especially if it’s not too much work and but looks and tastes delicious. Maybe because it’s so rare to be able to have a lovely meal, enjoy the daylight and tell yourself that you have the rest of the day to burn the calories off. Speaking of, my calves are still growing from the new workout schedule. The other day, when I zipped up my boots, I could actually feel my pulse in my calves. Please tell me there is a point at which this will stop.

FOR THOSE OF YOU WHO TIRE OF TEXT ALREADY: I’ve uploaded a how-to video for this recipe! It’s my very first video. So be afraid. Very, very afraid.

I’ve mentioned before that I belong to a CSA so I’m always trying to come up with creative ways to use the produce. I like kale chips, but kale chips all the time is something altogether different.

So one spring Saturday, I took out some very pretty eggs. Tanned, with some adorable little freckles. Is it disturbing to humanize your food is before you devour it?

I think these eggs look lovely and peaceful. Like they just came back from a restful spring break in Jamaica, but away from all the crazy college kids doing keg stands.

Spring break is over, friends. Time to get out of your shells and get to work! (I know, this post is getting a little weird.) Put the eggs in a bowl and beat them (and now it is disturbing to say that, now that I’ve humanized them). I actually ended up using 8 eggs, and added in a half cup of milk, but I thought this was pretty so I took the picture after 5. Beat in 1/4 tsp salt and some ground pepper.

Now slice up some bacon and fry it up — I like to do this in a cast iron pan. It weighs as much as an elephant baby but cooks really nice and evenly, and looks pretty and rustic too. Not that there’s anything about me or my life that’s rustic.

I’ve been using nitrite-free bacon lately, which is healthier but doesn’t last as long — so I’m quite liberal with using bacon when I’ve got a package open. If you had some left over you could try making a bacon nativity scene.

When the fat starts to render, add in some chopped up onions.

Once the onions begin to caramelize, grab a bowl of grape tomatoes and a handful of hand-torn kale or chard leaves, and add them into the pan.

Cook for about 30 seconds, stirring a bit, and then pour the egg mixture into the pan, over the other ingredients. Sprinkle a handful of shredded cheese (I used mozzarella). Stick into a 400 degree oven for about 10 minutes, til the edges begin to brown and pull away slightly from the pan. Enjoy!

SAVORY BACON KALE FRITTATA

Ingredients

  • 8 eggs
  • 1 cup grape tomatoes
  • 1/2 onion, chopped
  • 3 slices bacon, chopped into 1/2 inch pieces
  • handful of kale or swiss chard (about 1/4 cup), torn into bite-sized pieces
  • 1/4 cup milk
  • 1/4 tsp salt
  • pepper
  • 1/4 cup shredded mozzarella cheese

Preparation

Preheat oven to 400 degrees. Beat 8 eggs in a medium bowl and add in 1/4 cup milk, salt and pepper. Set aside.

Over medium heat in a cast-iron pan or oven-proof skillet, saute bacon until fat renders. Add in onions and cook until they begin to caramelize, stirring occasionally. Add in the tomatoes and kale or chard, cook for about 30 seconds, and pour the egg mixture over the other ingredients. Sprinkle the mozzarella on top.  Cook for 30 seconds on the stove.

Put the pan into the pre-heated oven and bake for about 10 minutes, til the edges begin to brown and pull slightly away from the pan. Add additional salt and pepper to taste.

Serves 4-6.

Tell me if you’re gonna try this!

Cooking Food

Red Pepper Soup

I am extra-specially-excited to share this recipe with you today because I have just made this spectacular red pepper soup in anticipation of having my friends Christine and Dirk, who care deeply about food, over for dinner. It’s so lovely and silky and has the perfect combination of sweet and slightly tangy and it makes you feel like you’re doing pliés with a very long flowing ribbon against a perfectly impressionist out-of-focus background.

I first had this soup at a baby shower for my friend Heidi. It was a lovely shower, where instead of gifts she requested blessings written on pretty cards for the baby. Now, having gone to many showers, I am actually quite skilled at baby shower games — including the ones, strangely, that you win by chance — and probably should have reported all those winnings as taxable income. But now that my friends aren’t having so many babies anymore, I’m a little more out of practice, so I was happy to try out this new format. With the close-knit and cozy nature of the shower, and the very personal and heartfelt nature of the blessings, there wasn’t a dry eye in the room. For me, especially, since I was probably over-hydrated after having at least four helpings of this soup. See if you can get away with less than four.

Sadly, I don’t know to whom to attribute this recipe. It was passed along by the woman who prepared it, Shannon, who got it from a cooking course she took.

Here’s a quick snapshot of what you’ll need:

Red Pepper Soup Ingredients

Ok, you’ll need a few other things that aren’t pictured, but I forgot to put them in the family picture. Sorry.

Start by slicing up all the veggies and fruit.

Sliced Peppers

Sliced pears

Heat up butter and olive oil in a pot, and throw in all the veggies and fruit. Don’t be alarmed if the pot looks very full, as the they’ll wilt down a bit. Add in 1/2 tsp crushed red pepper. Start the mood music.

Veggies in pot

You’ll want to cook until the veggies are soft, about 10-15 minutes. Add in 4 cups chicken stock and 1 tsp honey, and cook for another 30 minutes. Add in the salt and pepper and adjust to taste.

Blend it in batches til it’s all silky smooth. Garnish with a dollop of sour cream, or greens.

Blender
Yeah, I know, this is just a picture of my blender. I took it, so I'm putting it in.

This really is one of my all-time favorite soups. What are yours?

Red Pepper Soup

RED PEPPER SOUP

Ingredients

  • 8 red peppers
  • 3 carrots, peeled
  • 3 shallots, peeled
  • 1 clove garlic, peeled
  • 4 pears, peeled and quartered
  • 1 TBSP olive oil
  • 4 TBSP (1/2 stick) unsalted butter
  • 4 cups chicken stock
  • 1/2 tsp crushed dried red pepper
  • 1 tsp honey
  • 2 tsp salt / ground pepper to taste
  • Optional: sour cream, herbs to garnish

Preparation

Slice the peppers, carrots, shallots, and garlic. Heat olive oil and butter in a large pot over medium heat. Add in vegetables, garlic, dried red pepper  and pears (at first I typed “bears”. You definitely want “pears” for this one.). Cook until softened, about 10-15 minutes, stirring occasionally.

Add in the chicken stock and honey, and cook for another 30 minutes.

Puree the soup in a blender and pour back into the pot. Reheat over low heat, garnish with a dollop of sour cream or herbs, and serve.

Serves 4-6.


Cooking Food

Herbed Quinoa with Beets

I’m a pretty dedicated carnivore, but every once in a while I read an article like this one about death by bacon and I think, “Well, maybe it wouldn’t hurt for me to try to live 13% longer, just for today.” Even if the only result of all my recent working out is not awesome abs or toned arms, but bigger calves, and get this — a bigger butt. This was not what I was hoping to achieve. I may actually need to invest in a new pair of big butt jeans to accommodate. Yesterday I wore my jeans with a rubber band around the button, maternity-style. Sigh.

It was just me and the girls tonight, but I compensated for the meatlessness by clipping a few sprigs of jasmine from the garden and sticking them in a glass. So simple, but it smelled so fancy.

Jasmine

Anyway, back to dinner. I wanted to make something flavorful and filling, so I did a fridge raid and here’s what I found:

quinoa and beets
Quinoa and red beets

I heated up the oven to 400 and popped the beets in for an hour. I like to cook them in a covered ceramic container lined with parchment paper (for easy cleanup), but you can also just wrap them with aluminum foil. I’ve avoided cooking with aluminum foil ever since I read that it increases your chances of getting Alzheimer’s. I don’t need any extra help getting there.

I had cooked the quinoa the night before, but my favorite way to cook quinoa is in a rice cooker, so that it comes out perfect every time, but you can also follow the instructions on the package.

While the beets were roasting I grabbed some parsley, dill and scallions. Chopped them. Grabbed a handful of grape tomatoes and halved them with a serrated knife.

herbs

I made a quick little vinaigrette with 1/4 cup oil, 1/4 cup vinegar, 2 tablespoons of lemon juice and 1 teaspoon of salt and freshly ground better. Mixed it all up in a measuring cup.

Once the beets were roasted and slightly cooled, I peeled them (they slide right off if you apply pressure and push to the right) and diced them. I combined all the other ingredients, poured the vinaigrette over it, and tossed.

You know what? The kids actually liked it, and it was filling. Go keeeeeeeeen-waaaaaaaahhh!

HERBED QUINOA WITH BEETS

Ingredients

  • 3 cups cooked quinoa
  • 2 red beets
  • handful of parsley and dill, chopped
  • 4-5 scallions, sliced
  • 1 cup grape tomatoes
  • 1/4 cup oil
  • 1/4 cup white wine vinegar
  • 2 TBSP freshly squeezed lemon juice
  • 1 tsp salt
  • 1 tsp freshly ground pepper

Preparation

Roast beets in a covered ceramic container lined with parchment or wrapped in aluminum foil at 400 degrees for 1 hour. Meanwhile, chop herbs, slice scallions and halve grape tomatoes.

In a cup or small bowl, combine 1/4 cup oil, 1/8 cup vinegar, lemon juice, salt and pepper. Mix until uniform.

Peel beets and dice. Add the herbs, scallions, grape tomatoes, beets and vinaigrette to the quinoa and toss. Add salt and pepper and additional lemon juice to taste.

P.S. I didn’t do this but I’m thinking that adding a handful of toasted pine nuts to this recipe would make it extra delicious!

Cooking Food

Spring Chicken Stew

This week, I have been eating so much chocolate that it might actually be illegal. I was shaking at a friend’s party last night, before which I had just made a big batch of chocolate desserts, and, not to be wasteful, licked the bowls and spatulas clean. Except I’ve been doing that every day this week, sometimes more than once a day, and I can’t talk about chocolate anymore right now.

But it’s almost spring! And that means cool enough for stews, but warm enough for us to want to lighten them up a bit. Chicken stew is one of my favorites.  I love one-pot meals, and love them even more if they’re flavorful, colorful and easy all at once.

Gather all the stew-y ingredients: chicken, potatoes, onions, garlic, carrots, bay leaves…and I belong to a CSA, so this is a perfect time to use those seasonal root vegetables, and I like to throw in greens like carrot tops and mizuna too.

Chicken stew ingredients

Get out your dutch oven (my favorite is the Lodge Logic cast iron 5 qt, which is a total steal at less than $35, and has the added bonus of adding iron into your diet as you cook with it) and set it to 300. Dry the chicken with a paper towel and season it with salt and pepper. Heat vegetable oil in a pan in the dutch oven, and brown the chicken til it’s a nice golden hue:

Brown chicken in dutch oven

Meanwhile, chop up the veggies. When the chicken’s browned, move it to a bowl.

One more dollop of oil, and saute the onions with salt til they soften. Add in garlic, and thyme, just til it’s fragrant, and then stir in 1/4 cup flour. Stir in 1/2 cup of dry white wine.

Saute onions

Can you tell it’s starting to get dark outside? We’re almost done with the prep.  Add in the broth slowly, then potatoes, carrots, bay leaves and chicken with juices. Get it to simmer, cover it, and cook it in the oven for about an hour.

When it’s done, stir in a cup of frozen peas and the chopped greens (in my case, mizuna and carrot tops). Cover for 5 minutes and eat!  Here’s the recipe:

SPRING CHICKEN STEW (adapted from America’s Test Kitchen’s Classic Chicken Stew)

Ingredients

  • 3 pounds chicken thighs — I like bone-in and skin-on for more flavor, but for a lower-fat version, skip the skin
  • salt and pepper
  • 3 tbsp vegetable oil
  • 2 medium onions, chopped
  • 4 medium garlic cloves, minced
  • 1 tsp minced fresh thyme leaves or 1/4 tsp dried
  • 1/4 cup unbleached all-purpose flour
  • 1/2 cup dry white wine
  • 3 1/2 cups low-sodium chicken broth
  • 1 1/2 pounds red potatoes (about 4-5 medium), cut into 3/4 inch chunks
  • 1 pound carrots (about 6 medium), sliced 1/2 inch thick
  • 2 bay leaves
  • 1 cup frozen peas
  • 1/4 cup minced fresh parsley leaves and/or any other seasonal greens

Preparation

Adjust oven rack to the middle position and heat to 300 degrees. Pat the chicken dry with paper towels and season with salt and pepper.

Heat 1 tbsp of the oil in a large Dutch oven over medium high heat until just smoking. Brown the chicken lightly (about 6-8 minutes) and transfer to a bowl.

Add the remaining oil to the pot and heat until shimmering. Add the onions and 1/4 tsp salt and cook til softened, about 5 minues. Stir in the garlic and thyme and cook until fragrant, about 30 seconds. Stir in the flour and cook for a minute, and then add in the wine, scraping up any browned bits.

Slowly whisk in the broth, smoothing out any lumps. Add in the potatoes, carrots, bay leave sand chicken with any accumulated juices and bring to a simmer. Cover, put in oven and cook for an hour.

Remove the pot from the oven and remove the bay leaves. Stir in the peas, cover and let stand for 5 minutes. Stir in parsley or other minced greens and season to taste with salt and pepper.

Serves 6-8.


Baking Cooking Food

Homemade Granola

Happy Valentine’s Day!  To celebrate, I’ll share a picture of the one decent Valentine’s Day cookie that I did with royal icing. Will post about that another time, after I’ve recovered from the royal icing initiation.  I’ll just have to eat the rest of the evidence.

Valentine's Day cookie
The only cookie I'm willing to share publicly. Stamped the paper plate with non-toxic metallic ink.

Today one of my girls was home sick, so we spent a lazy day completely indoors and mostly in the kitchen. Which means we had plenty of time to make stuff. So I decided to try out Ina Garten’s Homemade Granola recipe that my friend Heidi shared with me. She said that it was delicious, and I proved it by having three bowls of it after I made it.   Here’s a closeup so you can get a sense of its sweet and nutty delectableness (look it up! It’s actually a word):

Homemade granola closeup

And it’s so easy to make that even I, who did this last time I tried to make something with rolled oats, was able to make it:

Burnt oats
This happened the last time I roasted oats. I followed the instructions and put them into the oven, took a shower, and came out with the whole house smelling burnt. Please do not shower when you are roasting oats.

Basically, all you do is coat oats, coconut and almonds in an oil-and-honey mixture, roast (you’ll want to turn them every 8-10 minutes to ensure even browning and to prevent the above from happening), and take them out when they’re a nice caramel brown all over.  Let it cool, and add in the dried fruit and cashews.  I bought some particularly plump dried cranberries and they made the cran-bites especially tasty.

Cooled granola with dried fruit and nuts
I used a rimmed baking tray for this and mixed the dried fruit in while the granola was on the tray for even distribution.

This was the first time I’ve made granola so I didn’t really mess with the recipe, but I’m seeing a lot of room for experimentation here (Raisins? Sunflower seeds? Tiny doll accessories embedded in my carpet?). After it all cooled (ok, and after I ate about a quarter of it) I put it into an airtight container, and am storing it next to my other cereals.  It’s the prettiest of the bunch!

Finished granola
Portrait of granola.

Here’s the recipe, courtesy of Ina Garten via my friend Heidi:

HOMEMADE GRANOLA

Ingredients

  • 4 cups old-fashioned rolled oats
  • 2 cups sweetened shredded coconut
  • 2 cups sliced almonds
  • 3/4 cup vegetable oil
  • 1/2 cup good honey
  • 1 1/2 cups small diced dried apricots
  • 1 cup small diced dried figs
  • 1 cup dried cherries
  • 1 cup dried cranberries
  • 1 cup roasted, unsalted cashews

Directions
Preheat the oven to 350 degrees F.

Toss the oats, coconut, and almonds together in a large bowl. Whisk together the oil and honey in a small bowl. Pour the liquids over the oat mixture and stir with a wooden spoon until all the oats and nuts are coated. Pour onto a 13 by 18 by 1-inch sheet pan. Bake, stirring occasionally with a spatula, until the mixture turns a nice, even, golden brown, about 45 minutes.

Remove the granola from the oven and allow to cool, stirring occasionally. Add the apricots, figs, cherries, cranberries, and cashews. Store the cooled granola in an airtight container.


Cooking Food

Linguine with Garlic Langoustine Sauce

A friend invited me to join her Mormon moms workout group that meets on Monday and Friday mornings, and I went today for the first time. Apparently Mormons like to go uphill really fast and leave Presbyterians like me with poor cardiovascular conditioning in the dust.  Then they do a bunch of pilates before doing it all over again (somehow finding a way to go uphill both ways).  Then, to spite me, Nike+ didn’t synch all my data and now I’ve been robbed of getting Nike Fuel points for a game that I don’t understand.

For this I deserve to eat.

This is super easy and great for entertaining. (I just wanted to write that because Barefoot Contessa does — I have no idea if this is great for entertaining but it is easy.)

I buy the langoustines from Costco, and they’re already cooked and frozen so I just thaw them in a mesh strainer. I’m sure I’m supposed to say that you should do this in the refrigerator but that’s not what I did. Oh, and langoustines are basically really small lobsters. I was going to link to a picture but I think it’s best not to see what they look like before you’re going to eat them.

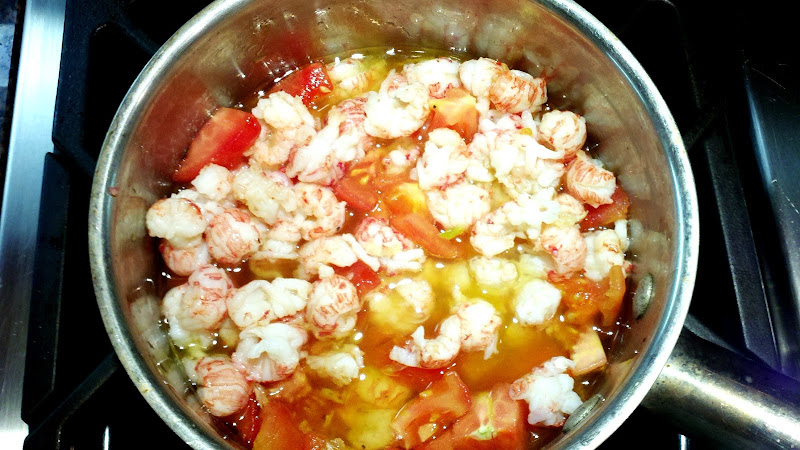
Once your langoustines are defrosted, chop up some garlic and tomatoes and heat up your olive oil, on medium to low. You’ll want to put the garlic in there to cook for about a minute, so that they just start to look slightly golden but don’t burn.  Try not to salivate into the pan.  Turn off the heat and add in the tomatoes and langoustine, stirring. Add salt and pepper.

If you want it to taste even better, add in a half of a dried red chili pepper while the garlic is cooking. The pepper seeps into the oil slowly and gives it a nice, warm, rich flavor.

Cover and let it sit for a bit for the flavors to meld. While you’re waiting, boil the linguine. Drain, toss the sauce with the linguine, garnish with parsley, and eat those carbs. You deserve it!

LINGUINE WITH GARLIC LANGOUSTINE SAUCE

Ingredients

9 cloves garlic, chopped fine

1/2 cup olive oil

1/2 pound langoustine tails (pre-cooked, drained and thawed)

1 ripe tomato

1/4 cup parsley, minced

8 oz (1/2 pound) linguine

(optional) 1/2 of a dried red chili pepper or 1/2 tsp paprika

salt and pepper to taste

Preparation

Heat oil in a saute pan over medium to low heat. Add in garlic  (and optionally, the chili pepper) and cook for about a minute, til it begins to be a very light golden hue. (For a milder spice, substitute paprika for the chili pepper.) Off the heat, and stir in tomatoes, langoustine, salt and pepper. Cover to allow flavors to meld.

Boil the linguine and drain. Combine with prepared sauce above, stir in parsley and serve.

Serves 2-4.

Cooking Food

Caramelized Brussels Sprouts with Garlic and Olive Oil

A date has been set for the EPIC BAKING DAY and I must continue to prepare. First, by purchasing more / larger pants with elastic waistbands and then determining the number of 30-pound bags of sugar I need to buy from Costco.  And I know this doesn’t make sense here but I just have to say that I LOVE HUMMUS. People sometimes ask me* what my favorite hummus is, and I have to say that it’s the Trader Joe’s Smooth and Creamy Classic Hummus. Man, I love that hummus! I’ve been eating it by the tubful in my pantry (and then telling people that my jeans are tight because I put on 10 pounds of muscle over the holidays).  It’s really good with tuna, and shepherd’s pie, and on whatever other leftovers I don’t want to taste in particular.  Sometimes I wake up at night in a sweat thinking about it. It’s that good.

I’ve been feeling bad that this blog on the whole presents more problems than solutions. So I thought I’d start sharing some things that people might find kind of useful, like…how to make brussels sprouts!

I belong to a CSA and this means that sometimes making dinner is kind of like being on Iron Chef, without all the fancy cooking stuff and the chefs. I’ve always liked brussels sprouts but they never really blew me away, and I never looked forward to them the way I look forward to hummus. Until The Day My Friend Carol Made These Brussels Sprouts.  Here’s how you do it:

First, you cut the sprouts in half.

Brussels sprouts halved

and then chop up some garlic. My mom peels garlic by using a meat hammer and squishing the cloves, so that’s what I’ve done here. It works well and it’s quick, if you don’t need the whole clove to stay intact. After you’ve squished them out of their skins, chop them up. I forgot to take a picture of that part.

Garlic

Then toss the sprouts together with the garlic, olive oil, salt and pepper in a baking tray, and broil for about 10 minutes. You’ll know it’s done when the sprouts turn a bright green and some of the edges start to carmelize.

Brussels sprouts in baking tray

and that’s it! This is the ONLY brussels sprouts recipe that my family will eat. Enjoy!

*Ok, in this case, people = me.


CARMELIZED BRUSSELS SPROUTS WITH GARLIC AND OLIVE OIL

Ingredients

  • 1/2 pound brussels sprouts, halved
  • 3 large or 5 small cloves garlic, chopped
  • 1/8 cup olive oil
  • salt and pepper to taste

Preparation

Prepare broiler.

Toss the brussels sprouts with the garlic, olive oil, salt and pepper to taste. Place on a baking tray and broil. Check after 4 minutes and toss the sprouts to ensure even exposure to heat. Pull the sprouts out after they’ve turned a brilliant green, and some of the outer leave have begun to carmelize, between 6-10 minutes. Season as needed with additional salt / pepper.

Serves 2-4.


Baking Cooking Food Popular

Double-Maple Cupcakes (and Cupcake Barf)

So I’ve basically lost my voice from screaming because Bakerella — THE BAKERELLA — commented on my blog.  As if I couldn’t love her more, she actually read my post and…her favorite color is turquoise.

Now that Danielle and I are all Hollywood and are basically just waiting for an invitation to bake with her, I decided to take a baby step toward cake pops and to bake some cupcakes on my own. If you’re training for a marathon, you build up to it.  Are you in fifth grade and would you like to read about baking? If so, this is the site for you!

The challenge: Double-Maple Cupcakes from Cooking Light. Except that I made them single-maple because I wanted to use buttercream frosting. I was first introduced to these cupcakes by my friend Christine, who is appropriately Canadian, and who baked them and brought them to work. They were the most fabulous cupcakes I had ever tasted, and I wanted to eat all 18 of them but had to just smile politely as co-workers passed them around and helped themselves to what could have been added to my portion.

Here is what I learned from this baking experience:

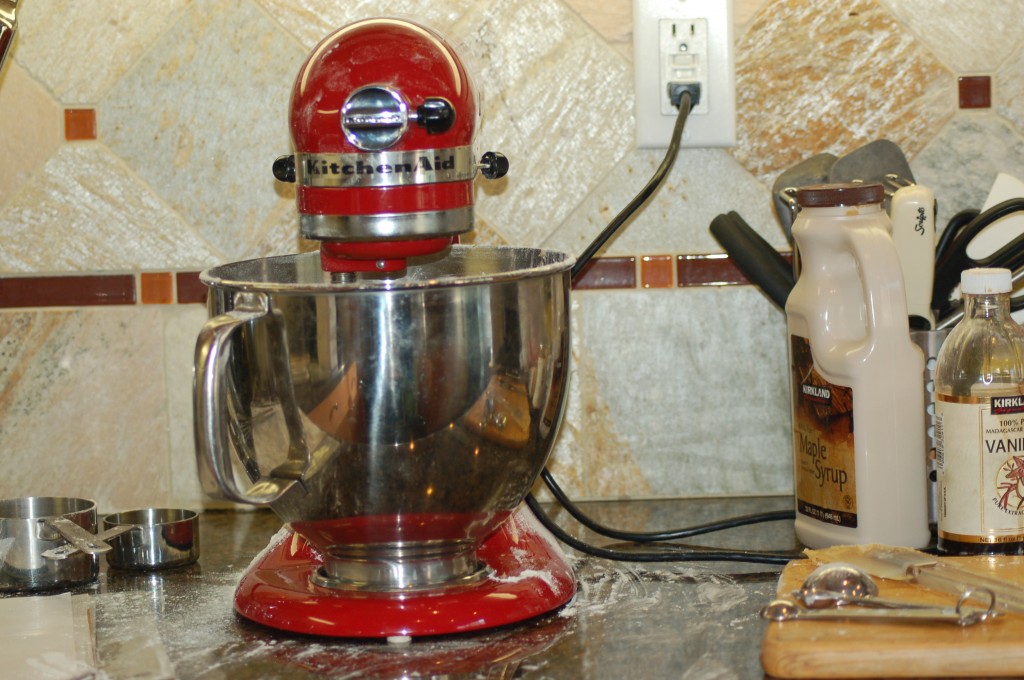
1. If you put a several cups of flour in the bowl of your KitchenAid mixer that you have used twice since you purchased it, and then turn the dial to High, you will distribute flour all over yourself and the kitchen. I also used a dough paddle which may have been wrong.

This would be an inappropriate picture for a food blog.

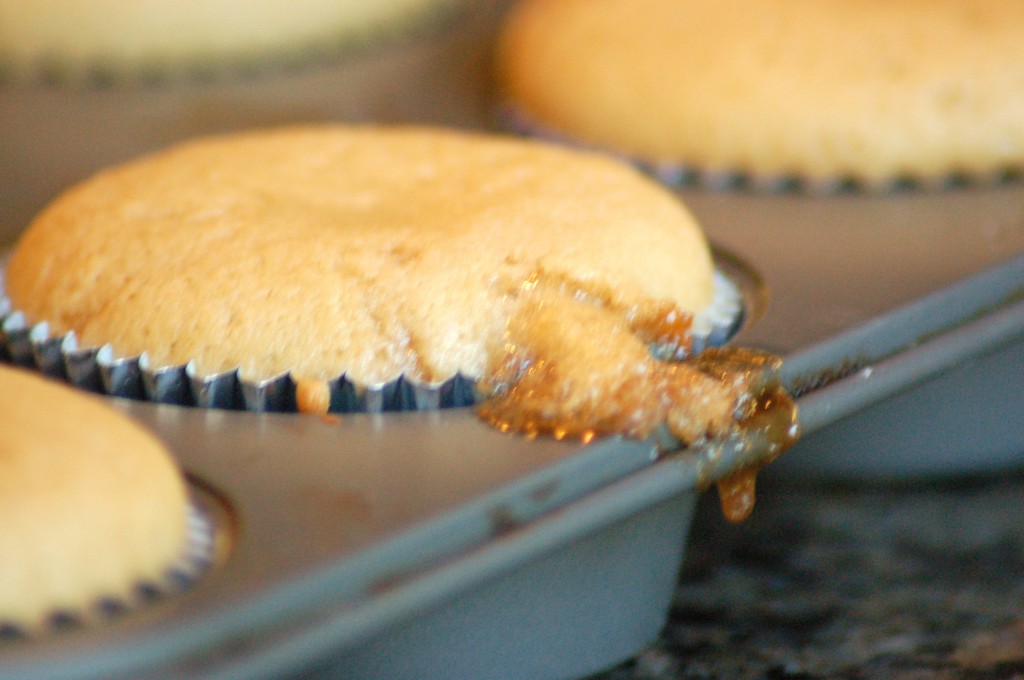
2. After you have done 1, you may no longer have the correct proportions of ingredients in your batter, and sometimes when this happens, your cupcake may actually throw up.

Cupcake barf. Unretouched photo.

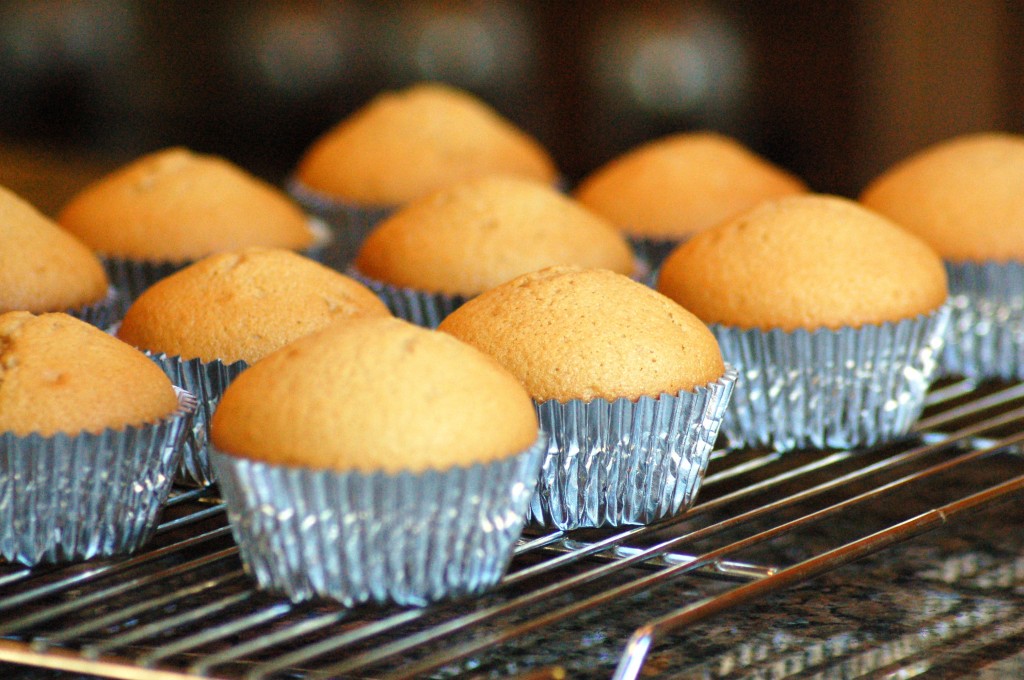
Overall, though, most of the cupcakes that were not unwell turned out pretty normal looking.

Normal looking cupcakes
The ones that didn't throw up.

And they frosted up nicely.

Frosted cupcakes
I know there are gaps in the frosting. Don't judge me.

So if you want to try this at home, here are the recipes (with instructions on how to make barfing cupcakes above):

DOUBLE-MAPLE CUPCAKES from Cooking Light:
Ingredients

  • 1/2 cup granulated sugar
  • 5 tablespoons butter or stick margarine, softened
  • 1 teaspoon vanilla extract
  • 1/2 teaspoon imitation maple flavoring
  • 2 large eggs
  • 1 1/4 cups all-purpose flour
  • 1 1/4 teaspoons baking powder
  • 1/4 teaspoon salt
  • 1/4 cup 1% low-fat milk
  • 1/4 cup maple syrup
  • Frosting:
  • 3 tablespoons maple syrup
  • 2 tablespoons butter or stick margarine, softened
  • 1/2 teaspoon vanilla extract
  • 1/2 teaspoon imitation maple flavoring
  • 1/8 teaspoon salt
  • 1 3/4 cups powdered sugar

Preparation

Preheat oven to 350°.

To prepare cupcakes, beat first 4 ingredients at medium speed of a mixer until well-blended (about 5 minutes). Add eggs, 1 at a time, beating well after each addition. Lightly spoon flour into dry measuring cups; level with a knife. Combine flour, baking powder, and 1/4 teaspoon salt in a bowl, stirring well with a whisk. Combine milk and 1/4 cup maple syrup. Add flour mixture to sugar mixture alternately with milk mixture, beginning and ending with flour mixture; mix after each addition.

Spoon batter into 12 muffin cups lined with paper liners. Bake at 350° for 20 minutes or until a wooden pick inserted in center comes out clean. Cool in pan 10 minutes on a wire rack; remove from pan. Cool completely on wire rack.

Ingredients
  • 1 cup unsalted butter (2 sticks or 1/2 pound), softened (but not melted!) Ideal texture should be like ice cream.
  • 3-4 cups confectioners (powdered) sugar, SIFTED
  • 1/4 teaspoon table salt
  • 1 tablespoon vanilla extract
  • up to 4 tablespoons milk or heavy cream
Preparation
  1. Beat butter for a few minutes with a mixer with the paddle attachment on medium speed. Add 3 cups of powdered sugar and turn your mixer on the lowest speed (so the sugar doesn’t blow everywhere) until the sugar has been incorporated with the butter. Increase mixer speed to medium and add vanilla extract, salt, and 2 tablespoons of milk/cream and beat for 3 minutes. If your frosting needs a more stiff consistency, add remaining sugar. If your frosting needs to be thinned out, add remaining milk 1 tablespoons at a time.

Food Health

Liquid Breakfasts

I love breakfast.  I love eating, and breakfast is the first thing you get to eat every day.  I love bacon. Eggs.  Butter.  During the week, though, breakfast is a lot less fun.  For me, it’s a rushed time, and with my new job I am usually on a call with an international group of people at an ungodly hour.  I need to be able to prepare something that can be done in increments as I hit the mute button periodically, and it needs to be quickly consumed.  But it also needs not to be disgusting.  I’m a snob like that.

So here’s a little meal that my friend Patricia suggested.  It’s actually surprisingly good.  You’ll need (the stuff I took an ugly photo of with my cell phone):

  • Almond milk (about a cup or so…though I don’t usually measure so you might have to experiment here); I’ve tried unflavored as well as vanilla and they both work fine
  • 1 Banana
  • 1 Avocado
  • Whey (I don’t really know what this is except that Little Miss Muffet ate them with curds in a nursery rhyme) — but at Patricia’s suggestion I got MRM brand 100% all natural whey in Rich Vanilla
  • (optional) Flax oil

All you do is slice up the banana and avocado, add in about a cup of the almond milk, a squirt of flax oil and a scoop of whey, and blend (I have a handy little Braun hand blender that makes this easy).  You can add in ice if you want it to be more smoothie-like, but I’m happy with it so long as everything else is cold.  The whey protein makes it filling — unlike with smoothies, this one tides me over til lunch. There you have it — healthy liquid breakfast!