I was going to call this Chinese Peasant Spareribs but decided not to risk retribution from the Chinese government for cooking peasants. But this, as far as I know (with my only credibility being that I am Chinese…American), is considered Chinese peasant food. It’s simple, yummy and comforting.
I took on a new project at work recently. It has to do with mobile, which is interesting if you’re into that. But it’s been a lot more work, and this is how it’s been going:
Now, drug addiction is no laughing matter, but it’s another thing altogether when you’re not on meth but you look like you do. You can see why I might need some comfort.
Before I start making this, I usually put three cups of rice in the rice cooker. If you don’t have a rice cooker, prepare 3 cups of rice per instructions on the package…but I don’t know how to do that because I was born with a rice cooker.
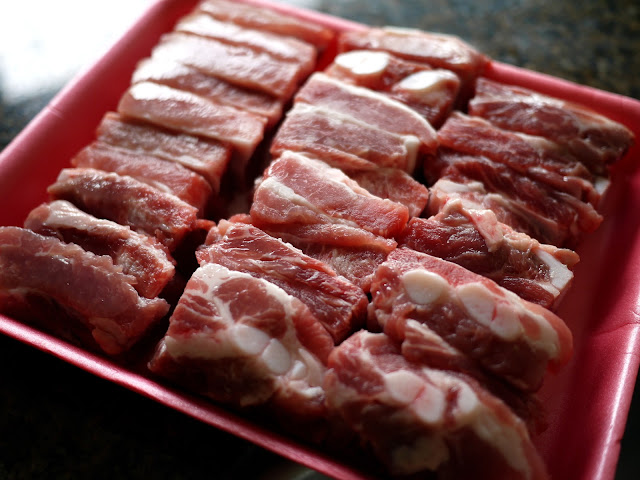
You want to start with some pork spareribs. Or shoulder. Some meat that has some nice fatty parts. Cut them into bite-sized pieces. As you can see, I take very large bites.
Marbling. That’s the nicer-sounding word that I wanted. You want meat with some marbling.
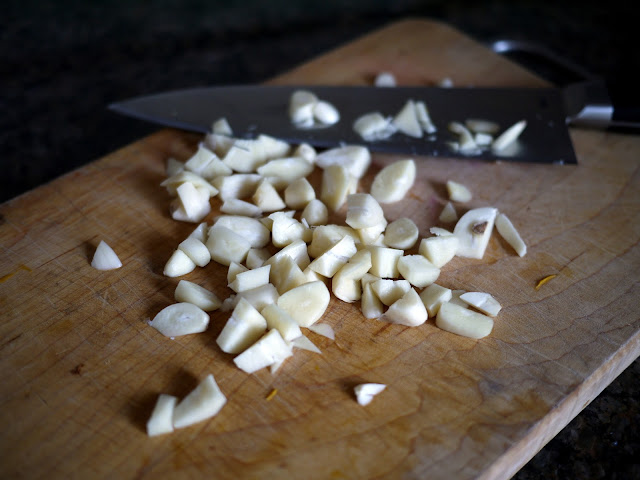
And garlic. Ever wonder why there aren’t any vampire movies where they’re chasing Chinese people? It’s not Chinese food if it doesn’t have garlic in it.
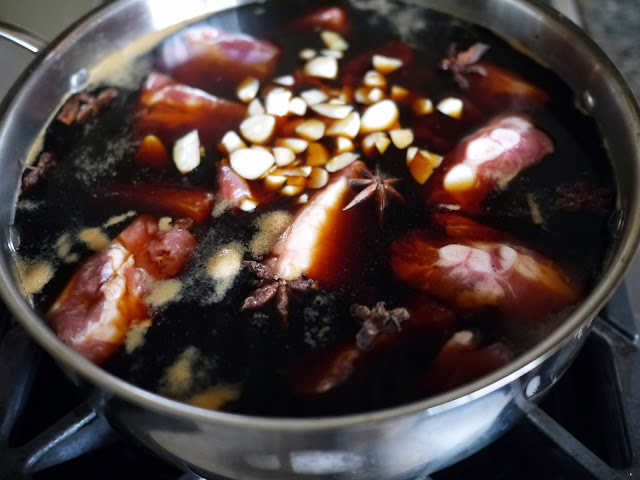
Put soy sauce, water, sherry, roughly chopped garlic, honey and star anise in a large saucepan. Add in pork spareribs.
Bring the pot just to a boil, and then turn down to a simmer. Cover and let simmer for 1.5 – 2 hours, til spareribs are very tender.
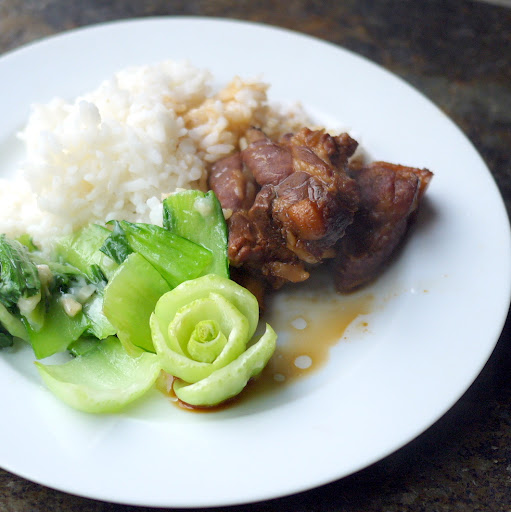
Serve over rice, generously spooning the sauce over the rice. The sauce is the best part.
I usually reserve the sauce and cook some peeled hard-boiled eggs in it for 30 minutes. When they’re cooled, I stick the pot in the fridge. The eggs will marinate in the sauce overnight and the next day you’ll have delightfully flavored hard-boiled eggs. More Chinese comfort food!
SOY, GARLIC AND ANISE SPARERIBS
Ingredients
2.5 lb pork spareribs or pork shoulder diced into 1 inch cubes
3 cups soy sauce
1.5 cups water
.5 cups sherry
1 cup raw honey
12 cloves garlic, chopped
7 star anise
Place all ingredients into a large saucepan. Bring to a boil, and then turn down to low to simmer. Cover and simmer for 1.5 to 2 hours, until pork is tender.
Serve with sauce spooned over rice and a side of vegetables if desired.
Ok, I’m going to tell you something about me that you can’t tell anyone who lives in California: I like hot dogs.
And I have a couple of packs of them in the freezer.
So I was excited when I saw this recipe from Ina Garten on a cold Sunday night, because it was a super-healthy and flavorful looking soup, mostly. Last time I looked I could not find sausage or hot dogs on any healthiest foods list, but I think life is all about balance so if you have a bunch of healthy, yummy ingredients in your recipe they should balance out the indulgent things. This is how I end up eating fruit-flavored ice creams. (If you follow my Facebook page, you’ll know that I recently made ice cream for the first time, and am sort of wishing that my eyes were never opened to what’s actually in it.)
This soup is a lot yummier than it looks….and while it’s not the most colorful soup ever, it’s a nice, hearty meal for a winter’s eve.
I didn’t take any pictures of the “making of” this time, sorry. I was too preoccupied with my hair. Here’s what’s going on with it:
I’ve been afraid to get it cut again for fear of disrupting my Tokyo haircut. That haircut is magical — completely no-maintenance and for the first time ever I actually kind of have volume. Next time you see Crystal Gayle, you’ll do a double-take and then realize that it’s just me.
I have actually been curling my hair to make it look shorter. This has resulted in a co-worker calling me San-do-ra in the office. It makes me look like I’m ready to go out on the town…in a 1950s kind of way.
Curled hair portrait, courtesy of photographer age 9, via Instagram
Anyway, it’s fun to mix it up every once in a while. Apologies for going on about it. There aren’t many women at the office and sometimes I just want to talk about my hair.
Back to the recipe. When I made it I substituted hot dogs for kielbasa, just because I had them. Make up a batch and enjoy it for a few days!
LENTIL SAUSAGE SOUP (from Barefoot in Paris by Ina Garten)
Ingredients
1 pound French green lentils (recommended: du Puy)
1/4 cup olive oil, plus extra for serving
4 cups diced yellow onions (3 large)
4 cups chopped leeks, white and light green parts only (2 leeks)
1 tablespoon minced garlic (2 large cloves)
1 tablespoon kosher salt
1 1/2 teaspoons freshly ground black pepper
1 tablespoon minced fresh thyme leaves
1 teaspoon ground cumin
3 cups medium diced celery (8 stalks)
3 cups medium diced carrots (4 to 6 carrots)
3 quarts Homemade Chicken Stock, recipe follows, or canned broth
1/4 cup tomato paste
1 pound kielbasa, cut in 1/2 lengthwise and sliced 1/3-inch thick
2 tablespoons dry red wine or red wine vinegar
Freshly grated Parmesan, for serving
Preparation
In a large bowl, cover the lentils with boiling water and allow to sit for 15 minutes. Drain.
In a large stockpot over medium heat, heat the olive oil and saute the onions, leeks, garlic, salt, pepper, thyme, and cumin for 20 minutes, or until the vegetables are translucent and tender. Add the celery and carrots and saute for another 10 minutes. Add the chicken stock, tomato paste, and drained lentils, cover, and bring to a boil. Reduce the heat and simmer uncovered for 1 hour, or until the lentils are cooked through and tender. Check the seasonings. Add the kielbasa and red wine and simmer until the kielbasa is hot. Serve drizzled with olive oil and sprinkled with grated Parmesan.
Makes 8-10 servings.
HOMEMADE CHICKEN STOCK
Ingredients
3 (5-pound) chickens
3 large onions, unpeeled and quartered
6 carrots, unpeeled and halved
4 celery stalks with leaves, cut in thirds
4 parsnips, unpeeled and cut in 1/2, optional
20 sprigs fresh flat-leaf parsley
15 sprigs fresh thyme
20 sprigs fresh dill
1 head garlic, unpeeled and cut in 1/2 crosswise
2 tablespoons kosher salt
2 teaspoons whole black peppercorns
Preparation
Place the chickens, onions, carrots, celery, parsnips, parsley, thyme, dill, garlic, salt, and peppercorns in a 16 to 20-quart stockpot with 7 quarts of water and bring to a boil. Skim the surface as needed. Simmer uncovered for 4 hours. Strain the entire contents of the pot through a colander, discarding the chicken and vegetables, and chill. Discard the hardened fat, and then pack the broth in quart containers.
It’s been a cold winter here in southern California — and I’m talking about a greater than +/- 5 degree variance in temperature. Scoff if you like, but cold is relative. Like the saying goes, a sweater is what you put on when your mother is cold.
Cold weather puts me in the mood for hearty stews. I like my hearty stews chunky (I like my peanut butter, however, smooth, and my beverages shaken, not stirred — as if I knew the difference).
A lot of my cooking is done Iron Chef-style, with whatever happens to be in the fridge (tonight, for instance, I made a cauliflower and leek soup using some leftover garlic butter made a few days back and chicken stock — and it was lovely), and what I love about this is that it feels a bit like a scavenger’s soup, delicious edition. I made this batch after Christmas with leftover ham and brought it on our ski trip. It would have been a little more wonderful if my friend (who was in charge of dinner the first night) hadn’t brought an 8.5 pound ham, and if we hadn’t had ham in every iteration thereafter. Also, if I didn’t have to ski so much. But I still do love ham and split pea soup.
My favorite part of skiing is that kids look like cute little astronauts with no joints. Based on that I am sure you have deduced that I am an excellent skier.
The best version of split pea soup I’ve had comes from The New Best Recipe from Cook’s Illustrated, which is one of my go-to cookbooks despite not having a single photograph in it that would qualify as food porn — so that is saying a lot.
Start by simmering the ham for 2-2.5 hours, til the meat falls off the bone. This makes flavor for the broth.
Take the ham meat and bone out; add split peas and thyme and simmer 45 minutes. When the ham’s cool enough, shred the meat. You’ll want to devour all the tender meat immediately, but try to hold off.
Saute onion, carrots and celery in oil, stirring frequently, for about 30 minutes til they’re really brown and caramelized. More flavor!
Add the veggies, potatoes and shredded ham into the soup and simmer about 20 minutes more. Season with salt and pepper and serve.
HAM AND SPLIT PEA SOUP (Cook’s Illustrated)
Ingredients
3 quarts water
1 piece (about 2.5 pounds) smoked, bone-in picnic ham
4 bay leaves
1 pound (1.5 cups) split peas, rinsed and picked over
1 tsp dried thyme
2 TBSP extra-virgin olive oil
2 medium onions, chopped medium
2 medium carrots, chopped medium
2 medium celery ribs, chopped medium
1 TBSP unsalted butter
2 medium garlic cloves, minced or pressed through a garlic press
pinch sugar
3 small new potatoes, scrubbed and diced medium
ground black pepper
minced red onion (optional)
balsamic vinegar
Preparation
Bring the water, ham and bay leaves to a boil in a large soup kettle, covered, over medium-high heat. Reduce the heat to low and simmer until the meat is tender and pulls away from the bone, 2 to 2.5 hours. Remove the ham meat and bone from the broth; add the split peas and thyme and simmer until the peas are tender but not dissolved, about 45 minutes. Meanwhile, when the ham is cool enough to handle, shred the meat into bite-size pieces and set aside. Discard the rind and bone.
While the ham is simmering, heat the oil in a large skillet over high heat until shimmering. Add the onions, carrots and celery; saute, stirring frequently, until most of the liquid evaporates and the vegetables begin to brown, 5-6 minutes. Reduce the heat to medium-low; add the butter, garlic and sugar. Cook the vegetables, stirring frequently, until deeply browned, 30-35 minutes; set aside.
Add the sauteed vegetables, potatoes and shredded ham to the soup; simmer until the potatoes are tender and the peas dissolve and thicken the soup to the consistency of light cream, about 20 minutes more (I still like my peas intact but very tender, so shortened this by 5 minutes). Season with pepper ot taste. Ladle the soup into bowls, sprinkle with the red onion, if using, and serve, passing the balsamic vinegar separately.
The recipe says that it serves 6, but I find it serves more like 8-10.
Happy New Year, friends! I’m a little sad to say goodbye to 2012, but nothing that a little (or a lot) of seafood can’t fix. It’s been a tradition in our house to have a seafood feast at New Year’s, and we’ve even been known to eat so much that we can barely breathe (resolution that year: reduce gluttony).
Some of my favorite meals are the ones that I don’t have to cook myself, and my husband did most of the cooking for our New Year’s Eve dinner. About 25 years ago I went to France with my family, and we had these mussels at a restaurant. For the next 25 years my parents talked about it. My husband grew up in France, so between all of us there is a significant Moules marinieres fan base in the family. My sister-in-law and brother-in-law kindly gifted me Ina Garten’s Barefoot in Paris which has a delicious version of this recipe.
Start by soaking the live mussels in water and flour for 30 minutes, which gets them to expel sand (mmm, nothing more appetizing than “expel” in a recipe).
Then, de-beard the mussels. Let them reveal their true identities.
My husband is wearing gloves because he sliced off part of his fingernail and finger using an ultra-sharp mandoline that I got from Sandra for Christmas. We love the mandoline but the lesson here is that when you use instruments made from a country with a sword heritage. you should be careful.
Sautee the shallots and add garlic.
Then add tomatoes, saffron, parsley, thyme, wine, salt, and pepper.
Add the mussels and stir.
Cook til the mussels open.
And then try not to eat too much.
Wishing you a savory 2013!
MUSSELS IN WINE SAUCE (Ina Garten, Barefoot in Paris)
Ingredients
3 pounds cultivated mussels
1/3 cup all-purpose flour
2 tablespoons unsalted butter
2 tablespoons good olive oil
1 cup chopped shallots (5 to 7 shallots)
1 1/2 tablespoons minced garlic (5 to 6 cloves)
1/2 cup chopped canned plum tomatoes, drained (4 ounces)
1/2 teaspoon good saffron threads
1/3 cup chopped flat-leaf parsley
1 tablespoon fresh thyme leaves
1 cup good white wine
2 teaspoons kosher salt
1 teaspoon freshly ground black pepper
Preparation
To clean the mussels, put them in a large bowl with 2 quarts of water and the flour and soak for 30 minutes, or until the mussels disgorge any sand. Drain the mussels, then remove the “beard” from each with your fingers. If they’re dirty, scrub the mussels with a brush under running water. Discard any mussels whose shells aren’t tightly shut.
In a large non-aluminum stockpot, heat the butter and olive oil over medium heat. Add the shallots and cook for 5 minutes; then add the garlic and cook for 3 more minutes, or until the shallots are translucent. Add the tomatoes, saffron, parsley, thyme, wine, salt, and pepper. Bring to a boil.
Add the mussels, stir well, then cover the pot, and cook over medium heat for 8 to 10 minutes, until all the mussels are opened (discard any that do not open). With the lid on, shake the pot once or twice to be sure the mussels don’t burn on the bottom. Pour the mussels and the sauce into a large bowl and serve hot.
Happy Christmas Eve and happy holidays! I should be scrambling around my house making canapes and getting ready for the flood of relatives coming through the door this afternoon, but I tarry. Instead, I’m thinking about whether I need to bake more of these cookies for tonight, and about things I would like but will not get for Christmas, such as:
A mechanism in my bed that allows a hole to be cut out so that I sleep on my stomach and still be able to breathe, massage-table style
An secret FDA-approved supply of injectible glucocorticoid that is only supposed to be administered by doctors but that I could administer myself whenever my skin breaks out
Back to things that I can make a reality: the kids and I baked these cookies for me to bring to the office for the holidays. They’re so easy that even I can make them, and the girls decorated liberally with sprinkles. I only had to make two colors of frosting (red and green) which makes me happy.
I believe that Martha Stewart is the original source for this recipe, which I got years ago in a cookie exchange. Here it is:
CHRISTMAS SHORTBREAD COOKIES (Martha Stewart)
This buttery cookie gets better with age: it can be stored up to a month, and over time the flavor deepens.
Preheat oven to 275 degrees F. In the bowl of an electric mixer fitted with a paddle attachment, cream butter and sugar on medium speed until light and fluffy, about 2 minutes. Add salt and vanilla, and beat to combine. Add flour, 1 cup at a time, beating on low speed until just combined.
On a very floured surface using a floured rolling pin, roll out dough to about 1/4″. (I used floured wax or parchment paper, below and above the dough — less sticky I find.) Use cookie cutters to cut into shapes. Bake until evenly pale golden but not browned, 13-15 minutes. Transfer to a wire rack to cool completely.
Makes 36 cookies.
For the icing, I used Marian at Sweetopia’s recipe here. If you need to know anything about cookie decorating, look around her site — she knows everything!
Hope this fills your emergency cookie needs. Now — to clean. Have a delicious Christmas and holiday season!
My trip to Tokyo would be best described as Sandi Dreams of Jiro Dreaming of Sushi. As the 2nd most difficult restaurant in the world to get into, going to Sukiyabashi Jiro may be the biggest accomplishment of my life. And I had to have a lot of help to get there.
We started thinking about a trip to Tokyo in July. My husband used to live there and my friend Sandra is living there now as an expat (whenever anyone tells me that they’re an expat all I hear is “living like a Kardashian”). For someone who loves food, fashion and bathrooms as much as I do, Tokyo is pretty much Mecca.
THE RESERVATION
Getting a reservation at Jiro’s, especially as a foreigner, was no small feat. From eater.com:
With three Michelin stars, an acclaimed documentary on the chef, and limited space, it’s no mystery that it’s tough to get in. What makes it nearly impossible to pull off, though, is that no one on staff speaks English, and that they tend to not welcome foreigners without a Japanese host. “If they detect an accent, it’s likely that they’ll tell you nothing is available,” says A Life Worth Eating’s Adam Goldberg, who had trouble getting in for quite some time but has since managed to dine there on multiple occasions.
For this we elicited help from Sandra’s friend Meg, whom I’ve never met but who, as far as I’m concerned, must be a mythical creature with superhuman powers to have gotten us a reservation. Attempt #1 was in September, where Meg was told that she could not make a November reservation until October 1.
On October 1, Sandra ventured over to Meg’s to commence the reservation-making. She dialed. And dialed. And dialed….and on the 100th try, got through:
Meg, a native Japanese speaker, made the reservation for us, under San-do-ra. San-do-ra was to bring a deposit of 20,000 yen at least a week before our reservation.
On November 14th, San-do-ra (not a native Japanese speaker) styled her hair like mine and did a reconnaissance trip, appearing at Jiro’s to bring the deposit. San-do-ra’s Japanese had clearly degraded between the time she made the reservation and the time she brought the deposit, but she had cash so it was okay. Even though she had her son with her as well as Flat Stanley.
On the morning of Monday, November 19th, we practiced asking if it was okay to take pictures, and then did photo drills (since the sushi should be eaten immediately after it’s made) where we pretended that a bunch of cheese was the sushi and I had to take photos and eat in rapid succession. I was also instructed to say, “Konichiwa, San-do-ra des” (“Hello, I am Sandra”) after which, as a non-Japanese speaker, I would be able to say nothing else and it would be clear to the staff that San-do-ra had a serious language-debilitating condition.
THE EXPERIENCE
We arrived early to the Ginza district and we did a practice run to the restaurant, followed by some brief shopping and a return about 10 minutes in advance of our reservation. We approached the door tentatively and were waved in by one of the apprentices, and after announcing my “San-do-ra des”, we were the first ones seated of the 10 seats in the restaurant.
Behind the counter were Jiro, his son Yoshikazu and an apprentice. I’d heard that Chef Ono is stern and the atmosphere is intimidating, but I didn’t get that feeling at all. It felt respectful, and focused. I didn’t mind the quiet so much.
We were presented with the day’s menu, which was listed in Japanese as well as English, and asked if everything looked okay:
Sole fish (Karei)
Squid (Sumi-ika)
Yellowtail (Inada
Tuna (Akami)
Semi-Fatty tuna (Chu-toro)
Fatty Tuny (Oo-toro)
Gizzard Shad (Kohada)
Abalone (Mushi-awabi)
Jack Mackerel (Aji)
Clam Shell (Hamaguri)
Needle fish (Sayori)
Prawn (Kurumaebi)
Ark Shell (Akagai)
Bonito (Katsuo)
Squilla (Shako)
Sea Urchin (Uni)
Baby Scallops (Kobashira)
Salmon Roe (Ikura)
Sea Eel (Anago)
Egg (Tamago)
I hid my camera (actually, San-do-ra’s camera) under the counter until my husband asked in Japanese if it was okay to take photos. They said that it was fine — sushi photos only — and actually provided a little orange mat for my camera to live on. I noticed as the meal progressed that others were taking photos too so I felt slightly less weenie-ish about it.
Yoshikazu cut the fish and Chef Ono assembled and shaped the sushi, brushing it lightly with soy sauce just before serving. First up was the sole. It was presented, as were all the other pieces, with a side of ginger, which I never used. The first thing I noticed was the delicious vinegared rice, which had a firm and decisively lively texture where you could feel each of the individual grains. The wasabi was, as was the case in each of the pieces, assembled into the sushi itself. Delicious.
I wasn’t a very experienced squid sushi eater, so have limited basis on which to compare this one. What surprised me about the squid was that the initial contact was crunchy – followed on by a chewy, cushiony texture.
Next up was a tender yellowtail:
And then the tuna. The lean tuna was the most beautiful piece of sushi I had ever seen. It had a breathtaking hue and it glistened as it awaited consumption. It didn’t disappoint – it was unexpectedly tender and a smooth, warm flavor, and it’s amazing that anything with low fat content could taste like that. The semi-fatty tuna was soft and smooth as well. The fatty tuna was like butter. That’s a very good thing.
The gizzard shad had quite a fishy flavor, reminiscent of sardines:
Abalone:
A tender jack mackerel:
After this one Jiro gave us lean tuna again — at which point his son and the rest of the staff starting yelling, “ah ah ah ah!!!” — he had given us another guest’s tuna! He laughed and apologized and gave the tuna to the rightful eaters, we all had a little laugh amongst ourselves. The mood was a bit more relaxed after that.
And this gorgeous clam:
In the film, Jiro says that he makes smaller portions for women, since sushi is meant to be eaten in a single bite. I didn’t observe this to be the case with me, but perhaps they perceived me to be large-mouthed. In any case, when I saw this one, I was little worried about how I was going to consume it in a single bite.
I was right. As soon as I put it in my mouth, I realized that there was no room for the manipulation involved in chewing. So I started to breathe deeply in the completely silent restaurant, telling myself do not gag, do not gag, whatever you do do not gag…and eventually my saliva must have broken it down a bit because I was able to chew. All this to say that I have little memory of how this particular one tasted since I was mostly focused on not being horribly offensive. I do recall that it was firm and that the sauce complemented it nicely.
Needlefish, which reminded me of squid in flavor:
Yoshikazu prepared the prawn and placed it in front of me. I gawked at it, six inches in length, and was trying to think of a way to eat it in a single bite without asphyxiation, until Yoshikazu started pointing at my camera and saying, “Photo! Photo!”
“Oh!” I said (very articulate) and laughed and snapped a picture. To my relief he took the prawn back after the photo and cut it into manageable halves. It was lovely, soft and lobster-like.
Ark shell had a snappy texture and flavor of a clam (since it is a clam):
The bonito to me was the star of the show. It had an unbelievably delicate texture, with smoky and scallion notes, balanced by a sauce that just made it all incredible. More bonito! I wanted to shout. More more more! But I just ate it and nodded as much like a Japanese person as I could.
The squilla, or mantis shrimp, surprised me. It was gritty and dry in texture — not at all what I expected. Hard for me to judge the quality of this one since it was my first time consuming squilla, but it was not my favorite.
The uni, or sea urchin, however, was divine. It completely melted in my mouth…like ice cream.
The baby scallops looked delicious. And they were. Again, this one was quite big: as you can see it’s taller than the other pieces, wrapped in some seaweed and topped with the scallops. I decided this was going to be a two-biter.
After bite #1, it totally fell apart. I tried to eat the fallen parts surreptitiously when Yoshikazu said, “One bite! One bite!” (Mental note: get mouth enlargement procedure before next visit.)
The salmon roe was divine: smooth, delicate and perfect:
By the time the sea eel came around I was pretty much drunk on food and started taking blurry pictures. It had a nice light sweetness to it from the sauce.
Last piece was the egg (tamago), which was perfectly evenly cooked all the way through, with a touch of sweetness like a very light, airy cake:
After the tomago we moved to a table away from the counter to have dessert, which was a sweet, incredibly juicy musk melon:
This is what someone looks like after eating all of that:
Here’s me with Jiro:
Photo credit: @KatyPerry
Just kidding. That’s Jiro with Katy Perry. I don’t think he’d ever let me get that close.
We went to pay and chatted with Yoshikazu about the release of the movie (they had posters and flyers by the door). Apparently Japan is the last place the film is being released. He was friendly and we had enough Japanese and English between all of us to have a pleasant exchange.
Then we exited and disappeared into the Ginza night.
Photo courtesy of Magnolia Pictures
Thank you to San-do-ra and Meg without whom this would never have happened!
November is upon us and that means bad food photo lighting for those of us who do our cooking in the evening and don’t have much in the way of lighting equipment (Exhibit 1, above). It’s also the month of Thanksgiving, and this past year I’ve tried to focus more on giving thanks as much as possible — it’s healthy, which in my book means it’s just like exercising and thus gives you free license to eat more. So in the spirit of the month of gratitude, and of mitigating the depressive impact of poorly lit food photos, let me give thanks:
…for my Sunday spent by ocean, and the Instagram app that enabled me to capture it:
…for mussels, which I can see only smothered in meuniere sauce:
…for starfish big
…and small
…and for hermit-crab gatherers who poke sea anemones in the tidepools.
I’m also really thankful for tortillas, because I can just buy them, and because we often make thin-crust pizzas using them as a base. I’m thankful for the tortillas that Trader Joe’s makes. They’re so good.
I’m thankful for our friend Simon, who was the best man at our wedding and who’s visiting from England, who had the idea to make garlic bread with tortillas.
I’m thankful that this recipe is so easy, but outrageously delicious. And low-fat, if you factor in all the thanksgiving I’ve been practicing.
Spread about 1/3 cup of shredded mozzarella cheese on top of the tortilla, pizza-style. Add two cloves of minced garlic and some dried herbs, like oregano or herbes de provence.
Then, because we’ve been so grateful, add a dollop of butter for good measure:
Bake on a heated pizza stone for 5-6 minutes, til the crust is crispy and brown and the cheese begins to bubble. Cut into slices, eat immediately, give thanks (in my case, to my husband who made these), and repeat!
GARLIC TORTILLA FLATBREAD
Ingredients
1/3 cup shredded mozzarella
2 cloves garlic, minced
1/2 tsp oregano or herbes de provence
1 pat of butter
1 tortilla
Preparation
Heat oven with pizza stone in it to 450 degrees. Spread garlic and mozzarella evenly over tortilla, leaving a 1/2 inch crust on the outer rim. Sprinkle oregano or herbs on top, and add a dollop of butter.
Bake for 5-6 minutes until crust begins to brown and cheese has melted.
Makes 1 tortilla flatbread (if you’re like us, you’ll want six!).
It’s Saturday! My favorite day of the week. What I like to do on Saturdays is to stay in my pajamas as long as possible, not brush my hair, and basically aspire to be the definition of “unkempt” in the dictionary (remember those?).
But first, three things happened to me on Facebook this week:
I have relatives in Asia who post occasionally in Chinese. When I hit “Translate” on a post this week, this is what I got: “Baby Flash today to the waist, my home is caring said Filipino: his wife, I help you with your horse at night to kill the chickens! I think that is OK under the NIE just two, so was delighted to accept. Didn’t think she really be practiced! In my bed at night to enjoy professional massage essential oil. Joy you are my angel! muaaah!” Can this be right? Is my cousin okay, and where is this professional massage essential oil coming from? How did they know how to translate muaaaaah?
My sweet friend Danielle at Cozycakes Cottage posted about me to her zillions of followers not once but twice! Very kind of her.
A high school friend posted on my wall that she just read about me in this month’s issue of Redbook. I was hoping it was a surprise article wherein they unveiled a special subsidy for me to focus on nothing but eating delicious foods for the rest of my life, but when I went out a lunch to get a copy, it was just an article about jobs. I’m the second from the left. I guess my part of the planet is about 45 degrees offset from everyone else.
Anyway, on to the food. As some of you know, I generally try to make tasty foods that are also reasonably healthy — though I won’t compromise on flavor. One of my favorite magazines (uh, aside from Redbook of course) is Whole Living, which is filled with beautiful photography and prose that reduces your cortisol levels upon reading. I like to read about food before I go to bed, so it’s a standby on my nightstand.
I also really love beets. Check out my header.
So when I saw this Beet Hash with Eggs, I knew that it was a message from God. I shalt make thine Beet Hash, and I shalt make it on the day before the Sabbath.
So I did.
It was easy.
Boil peeled and diced beets and potatoes for 7 minutes, and then fry them up in a pan with some onions.
Make four little wells in the hash, and fry up some eggs. That’s it! Well, mostly, read the recipe for details.
BEET HASH WITH EGGS (from Whole Living magazine, October 2012)
Ingredients
1 pound beets, peeled and diced
1/2 pound Yukon Gold potatoes, scrubbed and diced
Coarse salt and freshly ground black pepper
2 tablespoons extra-virgin olive oil
1 small onion, diced
2 tablespoons chopped fresh parsley
4 large eggs
Preparation
In a high-sided skillet, cover beets and potatoes with water and bring to a boil. Season with salt and cook until tender, about 7 minutes. Drain and wipe out skillet.
Heat oil in skillet over medium-high heat. Add boiled beets and potatoes and cook until potatoes begin to turn golden, about 4 minutes. Reduce heat to medium, add onion, and cook, stirring, until tender, about 4 minutes. Adjust seasoning and stir in parsley.
Make four wide wells in the hash. Crack one egg into each and season egg with salt. Cook until whites set but yolks are still runny, 5 to 6 minutes.
I’ve mentioned a few times before that one of the best pieces in my arsenal is Amora dijon mustard from France — there is simply no other mustard available on the American market that compares (the one that comes closest is Maille — but still it has too much sweetness and not enough kick. Maille seems to sell a different recipe to the American market than the European market. Maille, please stop that!).
This mustard forms the basis of a lot of deliciousness, from creating the perfect vinaigrette to the sauce for chicken dishes. People who don’t even like mustard love this mustard. It has Ryan Gosling-like powers.
My primary sources to date have been:
Asking my in-laws to smuggle me some from France (involves physical and psychological burden)
Buying them from questionable vendors at the farmer’s market ($12, with uncertainty on whether or not the jars are fewer than 5 years old)
Getting them from Amazon ($9 base price; $14.50 including shipping)
But today I discovered a more cost effective source: Simply Gourmand, a New York-based importer of French goods. Here you can get a family-sized jar of Amora for $4.90. The ground shipping is about $8.50 to where I live, so I spread out the cost by ordering five jars at a time (yes, I use it that frequently). I placed an order today and my total for 5 jars was $33, or $6.60 per jar including shipping. Je l’aime bien!
Let’s start a mustard revolution. Let’s move forward and say no to the pukey yellow squeeze-bottled ball game mustard with extra refined sugars! Equal mustard rights for Americans, I say!
But first, try the mustard. We’ll take it from there.
It’s been a busier week than usual and I’m not up for doing anything complicated in the kitchen. Twice this week I relied on the magic of the Bumble and Bumble Dry Shampoo since I couldn’t find the time to do the necessary hair washing (TMI?). In my zeal to de-grease my hair though I got a little too aggressive and ended up looking like a member of the Whig party.
I’m taking it easy tonight, and I’m not even taking pictures — the picture above was taken when I was in England this summer, and made this dish for a large dinner party. The one below was taken later this summer when we had some friends over for an impromptu dinner. So the point is, I make this dish a lot, because it’s easy, tastes amazing, and looks pretty if you don’t take a picture in bad lighting with a purple lighter in the backdrop like I did. This tastes a thousand times better than my picture makes it look.
I first had it at my friend Patricia’s house. We all greedily mopped up the drippings with bread, and I kept trying to think of ways to get everyone else out of the room (“Fire!!!”) so that I could drink the sauce. I begged her for the recipe and couldn’t believe how easy it was — the ROI on this is very high indeed.
In fact, I’m thinking I may save the sauce next time to start my own master sauce. Anthony Myint, one of my food heros and a fellow high school alum, in his book Mission Street Food: Recipes and Ideas from an Improbable Restaurant (you HAVE to read this book — it’s hilarious, inspiring and will change your life) writes that a master sauce is “…a fortified stock achieved by reusing the same sauce over and over. Some Western cooks find this gross, but to me, wasting perfectly good meaty broth is gross. The concentrated braising liquid results in a richer flavor, so if you’ve got it, flaunt it.” Well said, Anthony.
So this is how easy the recipe is: make a vinaigrette, essentially — olive oil, balsamic vinegar, dijon mustard and garlic; add in some rosemary and brown sugar, salt and pepper, and mix it all up. Place the chicken in the vinaigrette and let it marinate over night.
Stick it in the oven to bake, and be sure to serve with big crunchy slabs of bread to dip in the sauce.
ROSEMARY BALSAMIC CHICKEN (Patricia Lee)
Ingredients
8 skin-on, bone-in chicken thighs or half-breast, fat trimmed off
Marinade:
1/2 C balsamic vinegar
1/4 olive oil
1/4 C brown sugar
3-4 T dijon mustard
4-6 cloves of garlic, chopped
3-4 sprigs of rosemary— remove leaves and finely chop
1-2 tsp each kosher salt and freshly ground pepper, or to taste
Preparation
Combine marinade ingredients and mix together in a 9×13 baking dish. Place chicken pieces in marinade for 4-24 hours (with 24 hours preferred). Ensure chicken is coated well w/ marinade. Place dish in oven at 400 degrees, 35-45 minutes, depending on your oven (watch the skin as it burn easily from the brown sugar). The marinade should create a nice, yummy sauce for bread dipping.
**Note if there’s too little marinade in dish, it will evaporate during baking. If there’s too much, the chicken will “steam” rather than “roast.”